Contact sales now: info@ecommercetemplates.com
Ecommerce Templates > General Help > Mini css widgets & Mini Drop Down Cart

We have introduced 6 plug-ins in one small file that allows you to display a sign up form for your store mailing list, a minicart that displays on one line, the regular multi-line minicart, the mini client login displaying on one line and on multiple lines and the css based mini recently viewed.
These are all css based making configuration highly flexible and simple to install. They do require a minimum version of 6.0.3 and can be purchased together from our store tools page.
Copying and pasting 2 lines of code you can allow customers to sign up to your mailing list from any page on your store. All the elements can be styled through your css file meaning that it will fit seamlessly into any design.
Once you have purchased the ASP or PHP version from the store tools page, unzip the file and upload incminicss.asp or incminicss.php to the vsadmin/inc/ folder on your server. If you are using 2 vsadmin folders for security, ssl or language reasons the file should be uploaded to each inc folder.
The next thing you will want to do is copy the following two lines of code where you want the mini signup to appear on your store pages. For the ASP version that will be
<% minicssaction="minisignup"%>
<!--#include file="vsadmin/inc/incminicss.asp"-->
or for the PHP version
<?php $minicssaction="minisignup"?>
<?php include "vsadmin/inc/incminicss.php" ?>
You will need to make sure that those lines come somewhere after the other main 4 ASP or PHP include lines. These can usually be found near the top of the code anyway but it is worth checking to be sure.
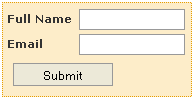
The final step is to style the signup box so it fits into your existing design and color scheme. These are the available css classes
The example above uses the following css copied into your main css file:
div.minimailsignup{
border:dotted 1px #e69d01;
background:#fdedc9;
margin:4px auto;
width:180px;
padding:4px;
}
label.minimailsignup{
display:block;
font-weight:bold;
width:70px;
padding-top:2px;
float:left;
}
input.minimailsignup{
font-size:12px;
padding:2px 2px;
border:solid 1px #999;
width:100px;
margin:2px;
}
input.minimailsubmit{
margin:6px;
}
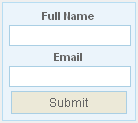
That design allows plenty of space for the signup box to have the labels to the left of the input fields but it may be that in your store, there's not so much space available. If that's the case reduce the width of the container in div.minimailsignup and the input fields in input.minimailsignup and also remove the declaration float:left from that class. That will place the text above the input fields as in the example here:
After signing up the customer will receive a thank you message on the cart page, along with a message to confirm their subscription to the newsletter. The contents of the mini signup box will then change to avoid people spamming the form and signing up multiple times:

If you have any problems with the installation, please take a look at the troubleshooting section below and if you need further clarification, please post on the support forum and one of our developers will be happy to help out.
![]()
![]()
The regular minicart expands as more items are added to cart and this may cause layout problems if you want to show the cart contents in the header section of your store pages. That's why we have released a cut down one line version. It doesn't include the extra features of shipping estimate, tax and discounts that you can see in the multi-line minicart but it does provide a clear guide to the number and grand total of items placed in the cart.
Once you have purchased the ASP or PHP version from the store tools page, unzip the file and upload incminicss.asp or incminicss.php to the vsadmin/inc/ folder on your server. If you are using 2 vsadmin folders for security, ssl or language reasons the file should be uploaded to each inc folder.
The next thing you will want to do is copy the following two lines of code where you want the one line minicart to appear on your store pages. For the ASP version that will be
<% minicssaction="onelineminicart"%>
<!--#include file="vsadmin/inc/incminicss.asp"-->
or for the PHP version
<?php $minicssaction="onelineminicart"?>
<?php include "vsadmin/inc/incminicss.php" ?>
You will need to make sure that those lines come somewhere after the other main 4 ASP or PHP include lines. These can usually be found near the top of the code anyway but it is worth checking to be sure.
The final step is to style the one line minicart so it fits into your existing design and color scheme. These are the available css classes
The example above uses the following css copied into your main css file:
div.minicartoneline{
background:#fff;
}
div.minicartoneline1{
padding:2px;
font: normal 12px Arial, sans-serif;
float:left;
color:#333;
}
div.minicartoneline2{
padding:2px;
font: normal 12px Arial, sans-serif;
float:left;
color:#333;
}
div.minicartoneline3{
padding:2px;
font: normal 12px Arial, sans-serif;
color:#333;
}
Please note that the "float" element is important to keep the content on one line. You can use your own minicart icon replacing littlecart1.gif in the main images folder with your own 16 x 15 gif file of the same name.
If you have any problems with the installation, please take a look at the troubleshooting section below and if you need further clarification, please post on the support forum and one of our developers will be happy to help out.
![]()
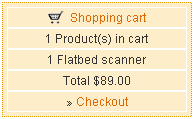
The original download of your Ecommerce Templates shopping cart software already comes with a minicart. It shows a summary of items that the customer has added to cart along with a shipping estimate, discounts that have been applied and any tax that is applied. The multiline css minicart here provides exactly the same functionality with the added bonus of extra formatting choices through the css classes we have made available
Once you have purchased the ASP or PHP version from the store tools page, unzip the file and upload incminicss.asp or incminicss.php to the vsadmin/inc/ folder on your server. If you are using 2 vsadmin folders for security, ssl or language reasons the file should be uploaded to each inc folder.
The next thing you will want to do is copy the following two lines of code where you want the multi-line minicart to appear on your store pages. For the ASP version that will be
<% minicssaction="minicart"%>
<!--#include file="vsadmin/inc/incminicss.asp"-->
or for the PHP version
<?php $minicssaction="minicart"?>
<?php include "vsadmin/inc/incminicss.php" ?>
You will need to make sure that those lines come somewhere after the other main 4 ASP or PHP include lines. These can usually be found near the top of the code anyway but it is worth checking to be sure.
The final step is to style the minicart box so it fits into your existing design and color scheme. These are the available css classes
The example uses the following css copied into your main css file:
div.minicart{
border:dotted 1px #e69d01;
background:#fdedc9;
margin:4px auto;
width:180px;
padding:4px;
}
div.minicartcnt{
text-align:center;
padding:2px;
font: normal 12px Arial, sans-serif;
border:1px solid #fff;
background-color: #fdedc9;
}
span.minicartdsc{
text-align:center;
font: normal 12px Arial, sans-serif;
color:#ff6600;
}
You can use your own minicart icon replacing littlecart1.gif in the main images folder with your own 16 x 15 gif file of the same name.
If you have any problems with the installation, please take a look at the troubleshooting section below and if you need further clarification, please post on the support forum and one of our developers will be happy to help out.
![]()
The regular mini login displays on three lines but if you are stuck for space in your design, you may find the one line mini login better suits your needs.
Once you have purchased the ASP or PHP version from the store tools page, unzip the file and upload incminicss.asp or incminicss.php to the vsadmin/inc/ folder on your server. If you are using 2 vsadmin folders for security, ssl or language reasons the file should be uploaded to each inc folder.
The next thing you will want to do is copy the following two lines of code where you want the one line minilogin to appear on your store pages. For the ASP version that will be
<% minicssaction="onelineminilogin"%>
<!--#include file="vsadmin/inc/incminicss.asp"-->
or for the PHP version
<?php $minicssaction="onelineminilogin"?>
<?php include "vsadmin/inc/incminicss.php" ?>
You will need to make sure that those lines come somewhere after the other main 4 ASP or PHP include lines. These can usually be found near the top of the code anyway but it is worth checking to be sure.
The one line minilogin uses the same css classes as the one line minicart above.
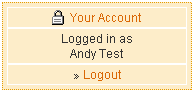
The original download of your Ecommerce Templates shopping cart software already comes with a mini login feature. It shows if a customer is logged in or not. The multiline css minilogin here provides exactly the same functionality with the added bonus of extra formatting choices through the css classes we have made available
Once you have purchased the ASP or PHP version from the store tools page, unzip the file and upload incminicss.asp or incminicss.php to the vsadmin/inc/ folder on your server. If you are using 2 vsadmin folders for security, ssl or language reasons the file should be uploaded to each inc folder.
The next thing you will want to do is copy the following two lines of code where you want the multi-line minilogin to appear on your store pages. For the ASP version that will be
<% minicssaction="minilogin"%>
<!--#include file="vsadmin/inc/incminicss.asp"-->
or for the PHP version
<?php $minicssaction="minilogin"?>
<?php include "vsadmin/inc/incminicss.php" ?>
You will need to make sure that those lines come somewhere after the other main 4 ASP or PHP include lines. These can usually be found near the top of the code anyway but it is worth checking to be sure.
The multi-line minilogin uses the same css classes as the multi-line minicart above.
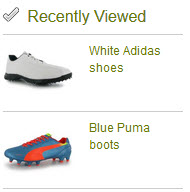
Your Ecommerce Templates shopping cart software already comes with a recently viewed feature but this widget adds more flexibility and features. It is css based and comes with its own css classes, making the formatting much easier to control. You also have the opportunity to link from the Recently Viewed heading to a product page made up of the products the customer has viewed. The order of the elements in the display can also be controlled.
Once you have purchased the ASP or PHP version from the store tools page, unzip the file and upload incminicss.asp or incminicss.php to the vsadmin/inc/ folder on your server. If you are using 2 vsadmin folders for security, ssl or language reasons the file should be uploaded to each inc folder.
The next thing you will want to do is copy the following two lines of code where you want the Recent View widget to appear on your store pages. For the ASP version that will be
<% minicssaction="recentview"%>
<!--#include file="vsadmin/inc/incminicss.asp"-->
or for the PHP version
<?php $minicssaction="recentview"?>
<?php include "vsadmin/inc/incminicss.php" ?>
You will need to make sure that those lines come somewhere after the other main 4 ASP or PHP include lines. These can usually be found near the top of the code anyway but it is worth checking to be sure.
Make sure you have turned the recently viewed feature on in vsadmin/includes.asp
recentlyviewed=TRUE
or in vsadmin/includes.php
$recentlyviewed=TRUE;
To set the order of the elements add this to vsadmin/includes.asp
recentviewlayout="category,productname,productimage"
or for the PHP version
$recentviewlayout='category,productname,productimage';
You can change the order or remove elements you don't want to show
These are the available css classes
So for example to get the layout shown above you would use the following in your css file
div.recentviewheader{
width:100%;
float:left;
border-bottom:1px solid #ccc;
padding-bottom:6px;
}
div.recentviewline{
width:100%;
float:left;
border-bottom:1px solid #ccc;
padding:6px 2px;
}
div.recentviewimage{
width:48%;
float:left;
}
img.recentviewimage{
width:70px;
float:left;
}
div.recentviewname{
width:48%;
float:left;
font-size:12px;
margin-top:8px;
}
and then this in vsadmin/includes.asp
recentlyviewed=TRUE
recentviewlayout="productimage,productname"
or in vsadmin/includes.php
$recentlyviewed=TRUE;
$recentviewlayout='productimage,productname';
Please Note
From Version 6.6 the "Recently Viewed" title will link to the products page listing the recently viewed items. In Version 6.5 and below you can set the link to the page of your choice with the following setting in includes.asp
recentviewlink="categories.asp"
or includes.php
$recentviewlink='categories.php';
The most common errors regarding the set up of the mini css widgets are the following:
<!--#include file="../vsadmin/inc/incminicss.asp"-->
<?php
session_cache_limiter('none');
session_start();
ob_start(); ?>
..and change it to
<?php
ini_set("session.cookie_domain", ".yourdomain.com");
session_cache_limiter('none');
session_start();
ob_start(); ?>
![]()

Add a drop down minicart to your ECT ASP, PHP or Wordpress based store. This plugin will display the contents of your cart when you hover over the cart link. The display includes the product image, name, price, total and discounts as well as the ability to delete items from the cart. There is a working example available on our Wordpress demo store.
It can be purchased from our store tools page.
After unzipping the download file, upload the file incminidropdowncart.asp to your vsadmin/inc/ folder and miniajaxdropdowncart.asp to the /vsadmin/ folder.
In the location you want the Minicart Drop Down to display add the following line to your HTML
<!--#include file="vsadmin/inc/incminidropdowncart.asp"-->
Finally the css in minidropdowncartcss.css can either be copied and pasted into your main css file or before the closing </head> you can add the path to the css file like this...
<link href="css/minidropdowncart.css" rel="stylesheet" type="text/css" />
...after uploading minidropdowncartcss.css to your /css/ folder on the server.
After unzipping the download file, upload the file incminidropdowncart.php to your vsadmin/inc/ folder and miniajaxdropdowncart.php to the /vsadmin/ folder.
In the location you want the Minicart Drop Down to display add the following line to your HTML
<?php include 'vsadmin/inc/incminidropdowncart.php'; ?>
Finally the css in minidropdowncartcss.css can either be copied and pasted into your main css file or before the closing </head> you can add the path to the css file like this...
<link href="css/minidropdowncart.css" rel="stylesheet" type="text/css" />
...after uploading minidropdowncartcss.css to your /css/ folder on the server.
![]()