
Contact sales now: info@ecommercetemplates.com
Ecommerce Templates > Shipping Help > Shipping labels
These instructions are good for Ecommerce Templates Version 6.4.2 and UPS Worldship Version 2014. WorldShip software is available free from UPS for customers who have a daily scheduled pickup http://www.ups.com/content/us/en/resources/techsupport/worldship/index.html
For a small fee you can also lease the thermal printer and get free (peel and stick) labels from UPS
Create a "mapping" in worldship to allow the import from the dumporders.csv file created with ECT.
RECOMMENDATION: If you allow customers to enter a separate shipping address on your store, you should set the following parameter to automatically copy over the billing address to the shipping field for orders where the customer does not enter a specific shipping address. In this setup, we will set the "mapping" to look for the shipping information only.
ASP Version - autobillingtoshipping=TRUE
PHP Version - $autobillingtoshipping=TRUE;
Start by dumping one or more orders to the desktop from the ECT admin.
The mapping setup will need to locate this file during the import setup process.
Verify that the exported file has the file-name dumporders.csv
HINT: Be sure your browser is set to ask you if you want to overwrite this file the next time you export, as you will want to do that whenever you are ready to import shipment info into Worldship.
Some browsers can be set to automatically save this file giving it a new name (dumporders(1).csv) and the import will fail in this situation.
The Worldship import will always look in the same location, for the same
(dumporders.csv) filename.
In Worldship, click Import-Export on the top menu.
In the Import/Export Tools menu, select the Tools icon and on the popout menu, chose Import/Export Wizard.
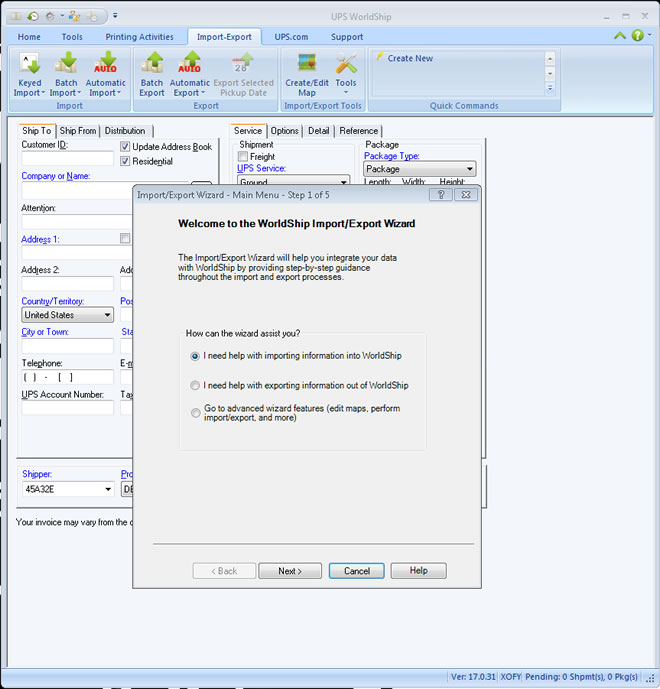
Be sure "I need help importing information into WorldShip" is selected and click Next.
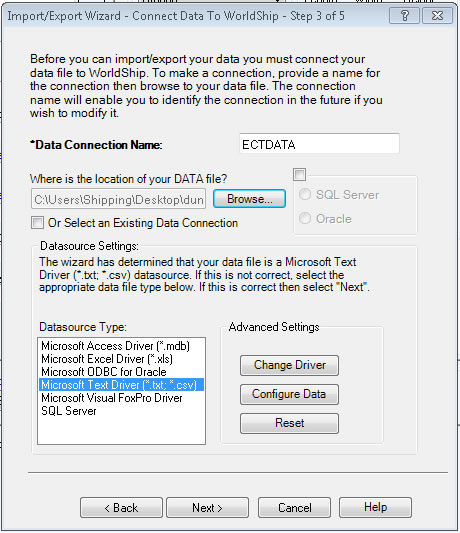
Choose the option "Small Package Shipments" and click Next Choose and enter a name for your connection. This can be anything you like - then click the "Browse" button to locate your dumporders.csv file.
Select the file and the wizard should now show that it has detected that you are using a .csv file
Click Next and the mapping screen will open.
The wizard will now show the fields from your dumporders.csv file and show the available fields in the shipping software.
Drag the following fields from the dumporders.csv (in the left window) over to the corresponding field in the ship to and service windows on the right.
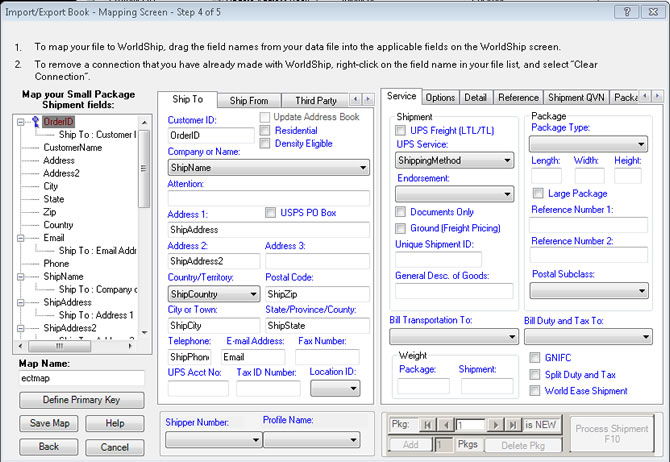
OrderID - Customer ID (this one is critical for "keyed" import process to work) ShipName - Company or Name ShipAddress - Address 1
ShipAddress2 - Address 2
ShipCity - City or Town
ShipState - State/Province/County
ShipZip - Postal Code
ShipCountry - Country/Territory
ShipPhone - Telephone
Email - E-mail Address (this one is critical for the worldship ect tracking number import feature to work) ShippingMethod - UPS Service (Some of these fields may be mapped differently to suit your needs although the Order ID and email fields are important for these instructions to work correctly.)
CRITICAL STEP: Give your map a name and define the primary key as CustomerID (CLICK OrderID in the left and click "Define Primary Key" to set that. Click Save Map - Then click Finish.
Next, you must fine tune a few things for the mapping to work.
In the Import/Export Tools menu, select Create/Edit map.
In the list of existing maps, you should see your new mapping. Highlight it with a single click and click "Edit"
In the bottom window, in the list of mapped tables, single-click ShipState and click "edit"
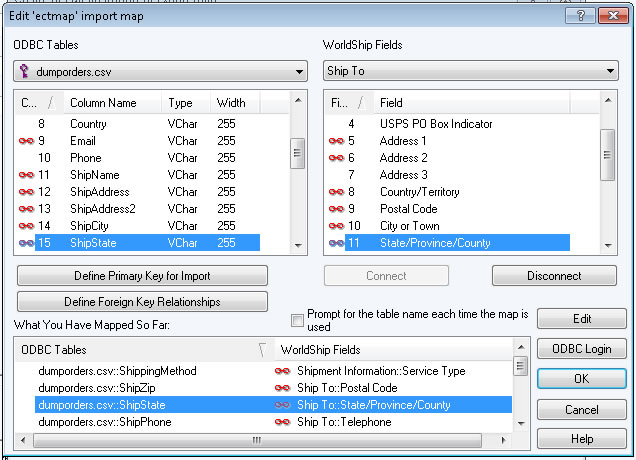
In the window that opens, click "Translations" - Select "state", then click OK. (This will instruct Worldship that the spelled out state name in the mapping, equals the abbreviated state name that Worldship requires.) If you ship to Cananda, you will need to manually add those provinces to the list.
For example, for Ontario (ON) enter Ontario in the "external Field" and ON in the Worldship field and click the "Add" button
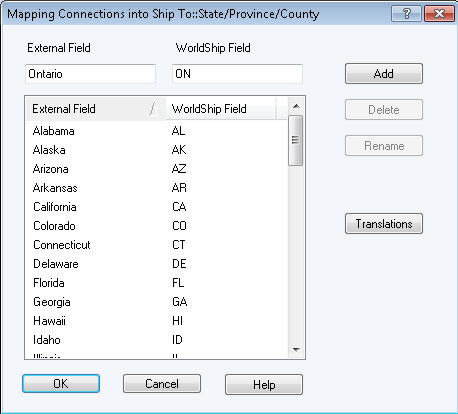
click OK once you complete that step.
Next, highlight ShippingMethod with a single click and click "Edit"
You will need to establish translations for the UPS shipping services.
for each of these, fill in and click "Add"
External Field - WorldShip Field
UPS Ground - Ground
UPS 2nd Day Air® - 2nd Day Air
UPS 3 Day Select® - 3 Day Select
UPS Next Day Air® - Next Day Air
Worldwide Expedited® - Worldwide Expedited
(If you use any other UPS services, you will need to create translations for those as well) Click OK to close that window, and then click OK to save the edits to your import map.
Click close, to close the edit map window and return to WorldShip.
You are now ready to test your import.
With the Import-Export menu selected, click the "Keyed Import" drop down, if you do not see your mapping on the list, select "More", and select the mapping you setup.
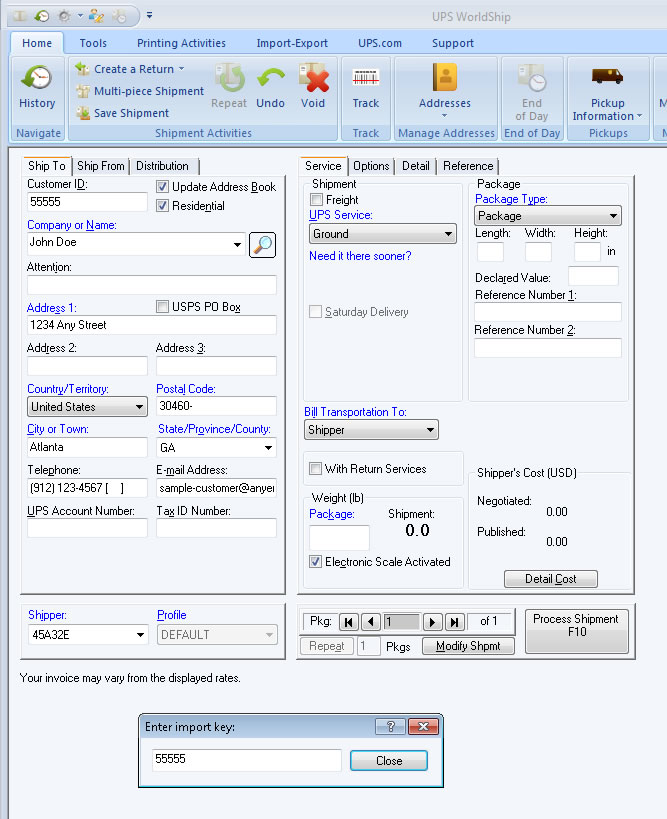
Click "Import" and a small floating window opens, asking for the import key. This will be an order ID from one of the orders in your export file.
Type in the order ID and hit "enter" on your keyboard.
The shipment fields will populate. Check to see that all fields are filling properly and compare to the customers order in the admin to see everything is correct.
You can drag the key import window down and leave it active so once you print that shipping label, it's ready for you to enter the next order ID you want to generate a shipping label for.
HINT:Press F8 on your keyboard to validate the address and add the +4 to the zip code. This helps avoid address correction fees from UPS.
If you have a scale connected to the Computer, the weight will fill in automatically (Assuming you have placed the box on the scale) and it's just a matter of printing the shipping label (click process shipment) and move on to the next shipment.
Once you have fully tested the mapping, here are the steps to generate daily shipping labels.
1 :In ECT ADMIN, Place all orders to be shipped into a common status type, such as "In Packing"
2: Click the status where these order are located (In Packing) and click search to list them.
3: Click GO to dump those orders to your desktop, overwriting the old dumporders.csv file.
4: In UPS WorldShip, Open the "keyed import" window (if not already open) and enter the order ID of the order you want to ship (hit enter on your
keyboard) the fields will populate.
5: Enter the weight (or have a connected scale do that for you) and print the shipping label.
6: Enter the next order ID and repeat steps 4 and 5 until all shipping labels are printed.
These instructions are created using UPS WorldShip version 2014 WorldShip software is available free from UPS for customers who have a daily scheduled pickup http://www.ups.com/content/us/en/resources/techsupport/worldship/index.html
TIP: Consider using instructions above to export shipment data from ECT into WorldShip for ease in creating shipping labels.
Create an Automatic export of daily shipment data in WorldShip.
In WorldShip, click Import-Export on the top menu.
In the Import/Export Tools menu, select the Create/Edit Map icon. The window opens.
In the lower half of the window, click the radio button for Export to ODBC Database and "tick" the box for Export CSV.
In the drop down menu for Map Type: select - Shipment.
Below that, enter a Name for the export. For example, - ECT-EXPORT
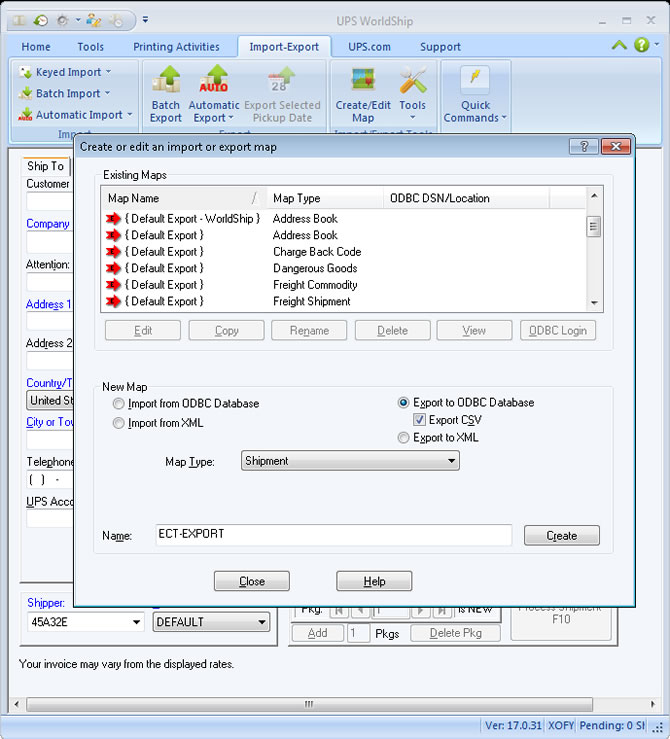
Click the "Create" button to open the mapping window.
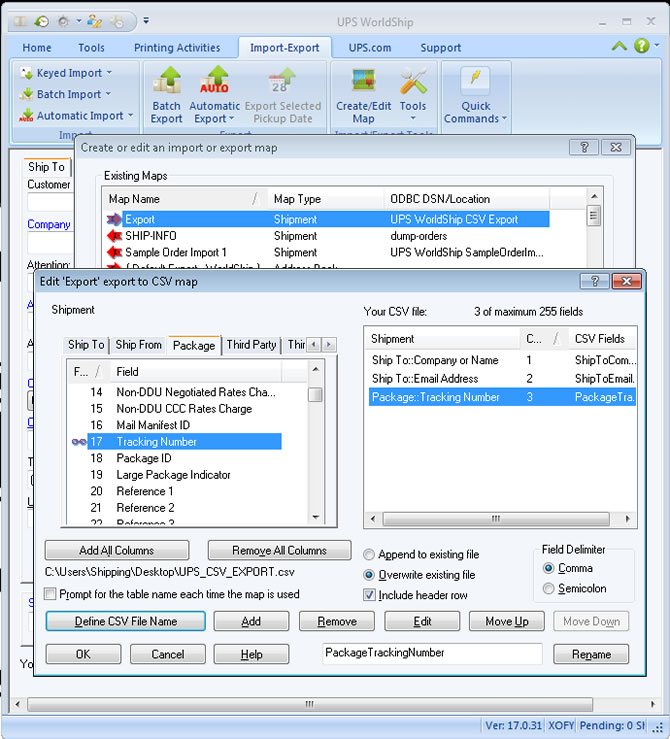
Here you will need to map three fields needed to create a working .CSV file required to update your shipments.
In the left pane, click the "Ship To" tab and highlight "Company or Name", click "Add" to add that field to your csv file. (it will now show in the right pane) Next in the left pane again, scroll down and highlight "Email Address", click "Add" to add that field to your csv file.
Back in the left pane again, click the "Package" tab, scroll down highlight "Tracking Number", click "Add" to add that field to your .CSV file.
Below the right pane, be sure the following radio buttons are selected.
Under Field Delimiter, select Comma.
To the left of that, select Overwrite existing file and "tick" the box for Include header row.
In the bottom left, click the button - Define CSV File Name, the window opens where you will enter a file-name (For example, - UPS_CSV_EXPORT) and location.
It is recommended you dump the file to your desktop.
Your setup should now look like the following image
Click "OK" to save your settings and close the window.
Click "Close" to exit the Create or Edit an Import or Export map window.
Now you can set your .CSV export to automatically occur when you click "End of Day" to send your data to UPS and prepare your driver pickup manifest.
With the Import-Export tab selected, click the Automatic Export icon, a drop down menu appears and hover over "Export During End of Day, then select "more" to open a window where your export file will be shown.
Click to highlight that, and click the "Export" button in the bottom right of the window.

Now you can test your export file by manually exporting recent shipment data.
With the Import-Export tab selected, click the "Batch Export" icon.
The Batch export data window opens.
Click to highlight your export file and next to "All records on or after" tick the box and enter the most recent date (typically the last business day) where you generated shipping labels.
Click Next and a preview window opens indicating how many records were found and other related information.
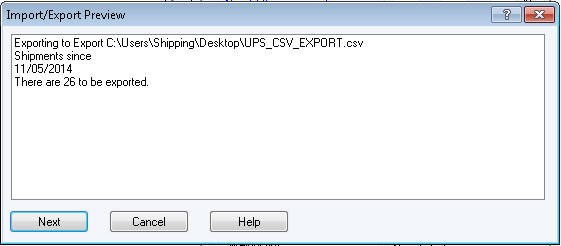
Click Next and you will see the animated progress bar and finally a window asking you if you want to save the file.
Select "Save" and your file will now be created on the desktop.
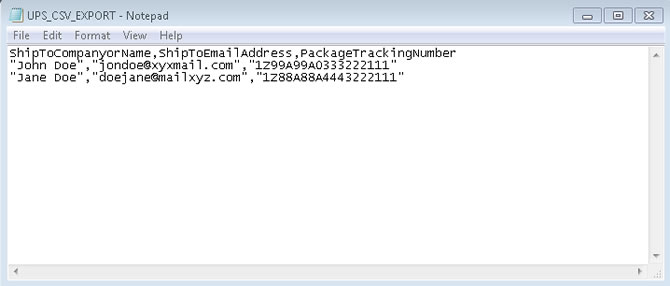
Check your file by opening in Notepad and it should similar to the following image.
The Worldship Import tool will update the status of your customers
order, send your status update email, and populate the tracking
number(s) easily with the following steps.
TIP: Place all of your outbound shipments in a common status type, such
as "In Packing".
Open the CSV file exported from UPS WorldShip in notepad.
On your keyboard, enter Ctrl-A to select all text in the file, then
Ctrl-C to copy the text to your clipboard. (Alternately you can use your
mouse to highlight the content and right-click>copy)
You can now close notepad.
Open your ECT Admin and click "View Orders".
Click the Dazzle/Worldship button to open the import window.
Click anywhere in the window, then on your keyboard, enter Ctrl-V to
paste the contents from your notepad file. (Alternately you can use your
mouse to right-click>paste)
Click the "Submit" button to process your data.
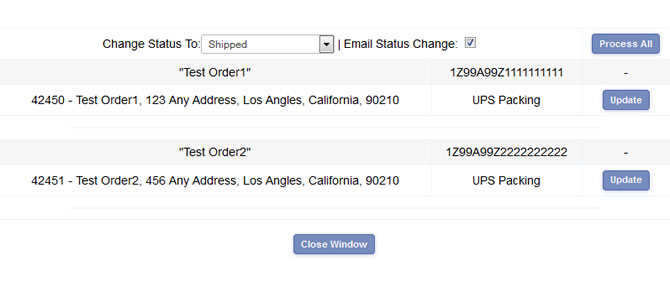
The utility will match your import data to customer orders.
In the top portion of the window, you will select the status you want to
change the orders to (typically "shipped") and tick the box if you would
like to send emails to your customers.
Scroll down the list of matched orders to review.
If you are sending multiple packages to a single customer, each package will have its own tracking number and listing in the window. When processing the list, only one email (if selected) will be sent to the customer. Any additional tracking numbers will populate in the tracking number field (spearated by a comma) of the customer order details.
NOTE: If a customer has multiple orders at your store, the import will show a drop down menu with that listing showing up to 5 of that customers most recent orders. This will allow you to be sure you are updating the correct order when you click "Process all". - EXAMPLE - A customer has placed a new order while you are processing and shipping an existing order. The most recent order is always shown, so you would manually change that to the correct order before processing the list.
Once you have reviewed the list of orders to be updated, you can update
the whole listing in one go by clicking "Process All". Alternately, you
can update each order individually by clicking "Update" next to each item.
TIP: Updating individually would allow you to change the status or email
option for each update if needed.
The orders disappear from the list as the are processed. Click "Close Window" to exit the WorldShip Import utility.
TIP: If you use the custom status emails available in ECT and you often ship multiple packages, you can show the customer additional tracking numbers in the status update email by using the following.
{Your Tracking number is: %trackingnum%}
{Additional Tracking number: %trackingnum%}
{Additional Tracking number: %trackingnum%}
{Additional Tracking number: %trackingnum%}
{Additional Tracking number: %trackingnum%}
{Additional Tracking number: %trackingnum%}
You can have as many as you like but the tracking number field is set to
255 characters in the database so that should allow for about a dozen
tracking numbers.
**The additional tracking numbers fields will be ignored in the email if
no additional tracking numbers exist.
Once you have fully tested the process, here are the easy steps to
update your daily shipments.
1:Process your shipments in UPS Worldship and run your "End of Day" -
automatically dumping the shipment data .csv file to your desktop.
2:Open the .csv file and copy the data.
3:Click the Dazzle/ Worldship button in your ECT Admin
4:Paste the .csv data in the window.
5:Review the list and process the data.
As if by magic, all orders are now updated.

![]()
UPS®, UPS & Shield
Design® and UNITED PARCEL SERVICE®
are registered trademarks of United Parcel Service of America, Inc.