
Contact sales now: info@ecommercetemplates.com
Ecommerce Templates > PHP Version Help > Payment Processors > Barclays ePDQ
![]()
Once you have created your account with Barclays the first thing you will need to do is download the file barclays_epdq_cpi_php.zip from our downloads page. The zip file contains the files you need for the integration with Ecommerce Templates. Unzip the download and upload the files to your server, overwriting any existing files - agree to overwrite if prompted.
Make sure you have uploaded these files to your server and open your ecommerce template admin payment providers page. Locate the payment provider listed as "Custom" and click on the Modify button. Fill in the details as shown below:
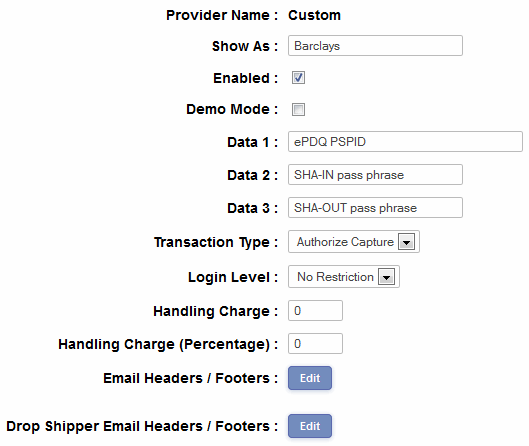
For Data 1 enter your ePDQ PSPID. We'll get the values for Data 2 and Data 3 as we go through the setup in your Barclays ePDQ admin.
Please note the Transaction Type is not used in the Barclays ePDQ integration.
Log in to your Barclays ePDQ Ecommerce admin section here...
https://payments.epdq.co.uk/ncol/prod/admin_epdq.asp
Once you have logged in, in the left hand menu click on Configuration -> Technical Information.
For the first page of parameters, "Global transaction parameters", the Default ECI value will be E-commerce with SSL Encryption.
Then click "Confirm and go to Global Security Parameters"
Make sure the Hash Algorithm is set to SHA-1
Then click "Confirm and go to Payment Page Layout"
Then click "Confirm and go to Data and origin verification"
Here you need to set the parameter for "URL of the merchant page containing the payment form that will call the page:orderstandard.asp" and this will be the URL in the address bar when you are on your cart page. For instance it could be...
http://www.yourstoreurl.com/
The "SHA-IN pass phrase" can be anything you like with a minimum of 16 alphanumeric characters. You will enter this value as "Data 2" in your Ecommerce Plus payment provider admin section.
Then click "Confirm and go to Transaction feedback"
For the Accepturl, Declineurl and Exception URL enter the address of the thanks.php page on your site. For instance it could be
http://www.yourstoreurl.com/thanks.php
For the Cancelurl enter your site home page, cart page or whatever page you want customers to return to if they cancel before payment.
You must check on this page "I would like to receive transaction feedback parameters on the redirection URLs."
Further down that page you must enter a value for "SHA-OUT pass phrase" and you will enter this value as Data 3 in your Ecommerce Plus payment provider admin section and should be a minimum of 16 alphanumeric characters.
Please note that the SHA passphrases cannot be the same in test as in live, and if they are using test, change this once testing is complete.
Then click "Confirm and go to Transaction e-mails"
That completes the settings you need for the Barclays ePDQ Ecommerce setup.
If you receive the error
unknown order/1/r/
Make sure the URL you check out on is exactly the same as the referring URL in your epdq set up ie it includes (or not) the "www" and that it is case sensitive.
Please do read our guide here on credit .
That's all there is to it really - any comments on the set up can be posted on our Support Forum.