Contact sales now: info@ecommercetemplates.com
Ecommerce Templates > General Help > The shopping cart page
Your shopping cart checkout process should look great right out of the box. But everybody wants something a little different and so there is a lot you can do to make your cart page unique to your store. We'll outline the tweaks which are available below so you can personalize your checkout to just how you like it.
In Version 6.5 we removed all the tables and replaced them with css resulting in meaner leaner code. It has also added a huge amount of flexibility to the layout with numerous css classes available so you can really personalize your checkout. Naturally it’s responsive ready so will work great on responsive designs.
If you are updating from a previous version you will need to upload the file called ectcart.css to the /css/ folder - this file provides all the css formatting for the various checkout steps as well as the other store generated forms like the search page, client login, order status page etc.
All you need to do is upload the folder /css/ to your store root from the updater.
Then on your store pages add this line somewhere before the closing </head> tag
<link href="css/ectcart.css" rel="stylesheet" type="text/css">
It should be added to all front end store pages.
Wordpress users should add the above to header.php somewhere before the closing </head> tag
You can of course change the css but any edits should be made to your main css file rather than directly to ectcart.css. We have some notes on that here.
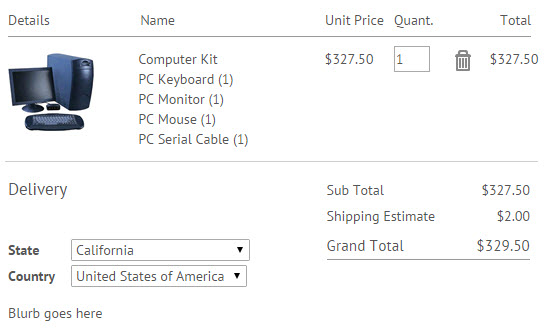
There are a couple of text entries you can add to includes.asp / includes.php if you want to. These are shown above with the title "Delivery" and the cart blurb, " Blurb goes here". Both can be changed to images if required.
You will need these additions to vsadmin/includes.asp
xxEstimatorTitle="Delivery"
xxEstimatorEnd="Blurb goes here"
or includes.php
$xxEstimatorTitle="Delivery";
$xxEstimatorEnd="Blurb goes here";
The div containing the text "You are only $xx from free shipping" can be formatted with the following class.
div.tofreeshipping{
font-size:16px;
}
if you want to change the font color use the following
div.tofreeshipping{
color: #000 !important;
}
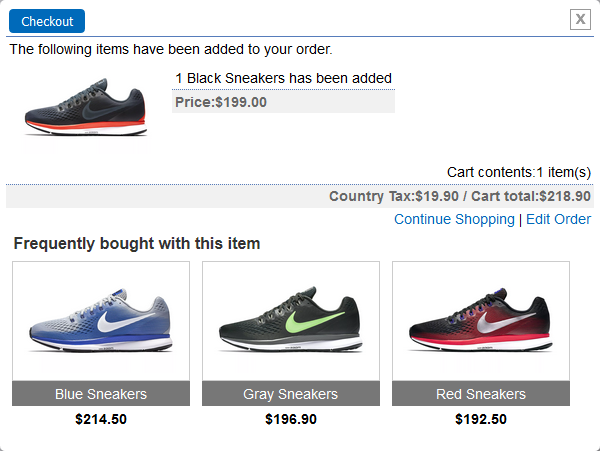
The soft cart was introduced in version 6.3 and comes in the form of a pop up when an item is added to cart
It is div / css based so it can be styled to fit the look and feel of the rest of your store.
The css used here is the following
input.sccheckout{
box-shadow: 0px 1px 4px 0px #BCC8DC;
background-color:#748dbe;
border-radius:4px;
border:1px solid #5B69AE;
display:inline-block;
color:#fff;
font-family:arial;
font-size:11px;
font-weight:bold;
padding:3px 5px;
text-decoration:none;
text-shadow:1px 0px 0px #6c79b7;
cursor:pointer;
}
div.scimage{
width:180px !important;
}
div.scprodsadded, div.sccartitems{
background-color:#eee;
}
div.scprice{
border-radius:4px;
background-color:#748DBE !important;
color:#fff !important;
margin-top:6px;
padding-left: 16px !important;
text-align:center;
}
div.sccarttotal{
background:#748DBE !important;
color:#fff !important;
}
These are the available css classes:
div.scart - the generic class which is available on all divs in the layout
div.scwrap - the main wrapper
div.sccheckout - the div containing the checkout button
input.sccheckout - the checkout button class
div.scclose - the div containing the close gif
div.scprodsadded - the div containing the text " The following items have been added to your order."
div.scimage - the div containing the thumbnail image
div.scproducts - the outer wrapper of the product details section
div.scproduct - the inner wrapper of the product detail section
div.scprodname - the div containing the product name (has been added)
div.scprice - the div containing the item price
div.sccartitems - the div containing the number of items in the cart
div.sccarttotal - the div containing the cart total
div.sclinks - the div containing the "edit order | continue shopping" links
a.scclink - the link properties for the continue shopping | edit order links
If you want to change the checkout button in the soft cart to an image, add the following to vsadmin/includes.asp
imgsoftcartcheckout="images/softimage.gif"
or to vsadmin/includes.php
$imgsoftcartcheckout="images/softimage.gif";
If you prefer not use the soft cart on your store and want to continue using a regular add to cart function, add the following to vsadmin/includes.asp
usehardaddtocart=TRUE
or to vsadmin/includes.php
$usehardaddtocart=TRUE;
There are extra css classes available for the hard cart
div.hardcarttable
div.hardcartstockwarn
div.hardcartaddproductline
div.hardcartaddproductquant
div.hardcartaddproduct
div.hardcartpleasewait
![]()
From ECT Version 7.0.4 it is possible to display related items in the soft cart. These would be items that are typically purchased with the item already add to the cart. If you haven't done so already you will first of all need to set up the related products in your product admin page of the store control panel.
You then need to decide which elements to display for each related product in the cart, you would do this by adding the following to your vsadmin/includes page
ASP Version
softcartrelated=TRUE
screlatedlayout="productimage,productname,productid,description,price"
To add an introductory header use
softcartrelatedheader="Frequently bought with this item"
PHP Version
$softcartrelated=TRUE;
$screlatedlayout="productimage,productname,productid,description,price";
Please note that as of version v7.1.4 you can use "ratingstars" in the soft cart related layout to display the Rating Stars.
To add an introductory header use
$softcartrelatedheader="Frequently bought with this item";
so for example if you wanted to show only the product image followed by the name and price that would be
productimage,productname,price
You can also change the order of the elements if you wanted to
![]()
Apart from using the css files there are other ways you can tweak the cart display.
In version 6.3 we added the possibility to show the checkout steps above each of the cart screens. It requires the following addition to vsadmin/includes.asp
xxCoStp1="Step 1 of 3 : Proceed to confirm your address details"
xxCoStp2="Step 2 of 3 : Check your address, enter any special instructions, select method of payment"
xxCoStp3="Final Step 3 of 3 : Summary of your order"
or vsadmin/includes.php
$xxCoStp1='Step 1 of 3 : Proceed to confirm your address details';
$xxCoStp2='Step 2 of 3 : Check your address, enter any special instructions, select method of payment';
$xxCoStp3='Final Step 3 of 3 : Summary of your order';

This uses the following css
div.checkoutsteps{
text-align:center;
font-weight:bold;
padding-bottom:4px;
margin-bottom:8px;
border: 1px #ccc solid;
background-color:#F9F9F4;
color:#666;
}
You can of course use your own text or change the text entries to images, for example

xxCoStp1="<img src=""images/step1.gif"" border=""0"" />"
$xxCoStp1="<img src='images/step1.gif' border='0' />";
In the cart screen shots above you'll see we have included the product image in the cart. To do that you will need the following in vsadmin/includes.asp
useimageincart=TRUE
or vsadmin/includes.php
$useimageincart=TRUE;
To link the thumbnail to its product detail pages you will also need this in includes.asp
linkcartproducts=TRUE
or in includes.php
$linkcartproducts=TRUE;
If you are using multiple shipping method you may want to provide a shipping estimate to your customers before they check out.
To do this add the following to vsadmin/includes.asp
estimateshipping=TRUE
or to vsadmin/includes.php
$estimateshipping=TRUE;
If you prefer to use radio buttons...

...use the following in vsadmin/includes.asp
shippingoptionsasradios=TRUE
or in vsadmin/includes.php
$shippingoptionsasradios=TRUE;
It is possible to add extra fields to the checkout with additions to vsadmin/includes.asp or vsadmin/includes.php - you may want to include fields for a company address, second address line or asking your customers how they found your store.
Payment methods can be shown as drop down choices...
...or using radio buttons
If you want to use radio buttons, use the following in vsadmin/includes.asp
payproviderradios=1
or in vsadmin/inlcudes.php
$payproviderradios=1;
There are other parameters available for hiding or showing features on the cart page such as removing the Remember Me feature, newsletter sign up on checkout, hide the coupon box plus shipping and insurance details. These can be found on the ASP or PHP parameters pages.