Contact sales now: info@ecommercetemplates.com
Ecommerce Templates > General Help > Using the control panel
Once you have uploaded all your files to the server and made the database connection then you will be able to log onto your control panel to start making changes to your store. The URL of your control panel will typically be www.yoursite.com/vsadmin/login.asp, or .php depending on the version you are running.
The default login for the control panel is
User: mystore
Password: changeme
...and we recommend changing that as soon as possible.
The first screen you will see after logging on will show the dashboard and links to the various admin pages. Please click on the links for in depth descriptions of each section of the control panel. Most links will open in a new window but some short descriptions are given at the bottom of this page.
Please choose from the list below.
(Version: Ecommerce Plus v7.0.1)
This is the version of your store and the number should be quoted if you should have any support questions. Updates are released on a regular basis and can be downloaded with the email used on the original purchase from our updaters page. Updates and support are free for the first 6 months after purchase and if you wish to continue for a following 6 months there is a fee of $44.95.
This is where you change the username and password to your control panel. The default is mystore / changeme - if you forget the combination then please visit our troubleshooting page to get details on how to reset the password.
From version 5.4 you can also set up secondary logins thus restricting access to specific admin pages depending on login.
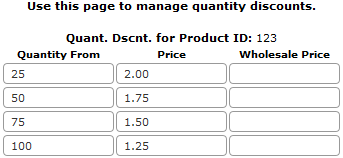
Quantity discounts / tiered pricing means you can adjust the price depending on the number of items of a particular product purchased. Check the box on the quantity pricing page if you want to show a drop down menu of all product ids you have available when setting up the price breaks. Leaving the box unchecked means that you will have to enter the product id manually. You can make your customers aware of the price breaks offered by adding the details to the product description.
Example:
If you wanted to offer your customers a price break for purchasing
multiple quantities enter the details in the boxes provided:
Purchase 25-49 items for a price of $2.00 each
Purchase 50-74 items for a price of $1.75 each
Purchase 75-99 items for a price of $1.50 each
Purchase 100+ items for a price of $1.25 each

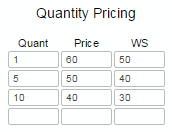
In Version 6.5 the quantity discounts were moved to the individual product pages making for quicker and more visible editing. Open the admin products page and next to the additional sections and product attributes you'll find the quantity pricing grid.

In the example above if a customer buys between one and four items they will be charged $60 per item for the retail price and $50 per item for the wholesale price (WS). If a customer buys between 5 and 9 items they will be charged $50 per item and $40 per item if they add ten or more to cart.
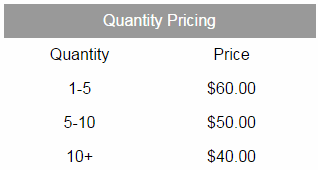
You can display the quantity pricing on the product detail page with this addition to vsadmin/includes.asp
showquantitypricing=TRUE
or to includes.php
$showquantitypricing=TRUE;
The display, once styled via the css file, will look something like this

This uses the following css
div.detailquantpricingwrap{
float:left;
width:100%;
}
div.detailquantpricing{
text-align:center;
margin:0 auto;
}
div.detailqpheading{
float:left;
padding:6px;
background:#999;
color:#fff;
width:300px;
}
div.detailqpheadquant{
float:left;
padding:6px;
width:140px;
}
div.detailqpheadprice{
float:left;
padding:6px;
width:140px;
}
div.detailqpquant{
float:left;
padding:6px;
width:140px;
}
div.detailqpprice{
float:left;
padding:6px;
width:140px;
}
If you are using the css custom product detail layout you can add "quantitypricing" as an option to the "detailpagelayout" parameter.
If you are using Spry Tabs you can have the quantity pricing in its own tab by using the "specials" feature eg
ecttabsspecials="<ecttab title=""Quantity Pricing"" special=""quantitypricing"">
or for the PHP version
$ecttabsspecials='<ecttab title="Quantity Pricing" special="quantitypricing">';
If you need to block someone using a particular or range of IP numbers then you can set them up here. Use this function sparingly so as not to block legitimate users. Visitors who are blocked will not be able to complete the checkout process.
Click on this link to log out of your control panel
In Version 6.8.1 we included the possibility to add your own css to personally style elements in the layout of the control panel. For example you may want to change or add styling to the admin orders / invoice / packing slip screens. To do this all you need to do is create a file called ectadmincustom.css and upload it to the vsadmin folder. This is your own custom file so won't be overwritten by updaters. Any styling you add here will take preference over the regular adminstyle.css file so is very useful for any admin personalization you might want to carry out.
For example you might want to remove the shipping section from the printable invoice and / or packing slip. To do that you would add this to ectadmincustom.css
div.invoiceshipping, div.packingslipshipping{
display:none;
}
To remove the additional details section use...
div.invoiceadddetails{
display:none;
}