
Contact sales now: info@ecommercetemplates.com
Ecommerce Templates > General Help > The Control Panel > Admin orders page
Hopefully the Orders Admin page will be the one you will visit most so it is important to know your way around. You will receive a notification email for each order that is placed through your store but it is a good idea to check the page regularly in case the purchaser didn't make it back to your store after buying and the email notification wasn't triggered.
Clicking on the View Orders link in your online control panel will bring up the orders admin page:
The interface here will provide you with all the information on orders as well as the ability to search your order database, change the order status, download orders etc.
The various options on this screen are outlined below:
To refine the search options you can select one or a combination of parameters:
Orders From / On – Orders Till: This is where you can specify a date range. Clicking on the “Orders From / Orders To” button will bring up a calendar for easier date selection.
It is also possible to add single numbers to the From / Till fields. If you need to view orders between the last 2 to 4 days then place 2 in the Orders From box and 4 in the Orders Till. If you need the orders from 4 days ago then place 4 in the Orders From box and leave the Orders Till field blank.
Search Text: This will allow
you to perform a search selecting from the following parameters:
Order ID
Email address
Auth code
Name
Address
Zip
Phone number
Affiliate id
Invoice number
… and can be further refined by choosing the date selection, payment method, state, country and/or Order Status. This will also come in useful for your marketing when you can make advertising decisions based on where your orders are coming from.
Click on "Search" to find the orders you are looking for. Click on "Stats" to get the order statistics for your search.
Dump orders to CSV file: Clicking here will prompt a download of the orders. This can be opened in Excel. It will give details of the order such as address, price, quantity and shipping.
Dump details to CSV file: This will also include the product information.
New Order: Click here to manually enter an order. From version 5.9 if you start typing someone's email address that they have used for past orders or have created a client login account with, the system will now look up that email and any addresses that are associated with it. Selecting the email will populate the address fields and also, in the case of a customer account link the account to the order created. If you start typing a new product id in the product id field, or product name in the product name field the system will search for matches and populate a drop down list to select from. When you select from that list (or click the "..." button as before) the product details / prices are retrieved from the server. You will need to make sure you have checked the box "Use Auto Complete Feature" in the top left of the admin orders page...view video tutorial
Packing slips: Select the orders using the checkbox next to each order to view multiple packing slips on the same page. When printed they will print on separate sheets.
Invoices: Select the orders using the checkbox next to each order to view multiple invoices on the same page. When printed they will print on separate sheets.
Dazzle: Click on the Dazzle button to paste the contents of your Dazzle output file. This will update all shipments with their tracking numbers and will update the order status to shipped on all orders included in that file.
Product images in the admin orders page

You can display the product image in the admin order details and / or packing slip or invoice using the following parameter in vsadmin/includes.asp...
imgonorderdetails=7
or vsadmin/includes.php
$imgonorderdetails=7;
A value of 1 will add the product image to the "view order details" screen
A value of 2 will add the product image to the packing slip
A value of 4 will add the product image to the invoice
...and you can add those values together so for instance setting it to 6 will add the image to the invoice and packing slip. 7 will add it to all screens apart from the "edit order" screen.
When viewing the order admin page or looking at the results of a search you will be presented with a table of results.
Order ID: This is the order number and the first order on your store will be “501”. Click on the order number or on the Name to bring up the full details of that particular order.
Printing the invoice / packing slip
If you select Printable Packing Slip from the drop down menu
you will be presented with a printable
version.
You can add your own header, address and footer to smarten it
up – to
do this you will need to make the changes in your vsadmin/includes.asp
file - there are details in our parameters
page or for PHP version in vsadmin/includes.php where the
details are here.
Method: This will show how the client has paid. Information in red will indicate an uncompleted order.
AVS: This stands for Address Verification Status and indicates the address match made with card used on purchase. Your payment provider should offer a list of possible results.
CVV: The cardholder verification value comes from Visa. Your payment provider should offer a list of possible results.
Auth code: This is a very important field and particular attention should be paid to the message that appears here. Under normal circumstances, when an order goes through an authorization code will appear here – this means that the order has been received and the purchaser has returned to your store and should have received email notification of their purchase. If you see an “authorize” button, as in the example above, the most likely reason is that the buyer abandoned the cart before going through with checkout. It may be that they changed their mind, suffered a power failure or were simply testing the system, however it may also be possible that they never made it back to your store after purchase. For this reason it’s important to check with your credit card processing admin page before deleting or authorizing. If you find that the order did in fact take place then you can click on the authorize button and add the authorization code given by the payment processor. If there is no record of the order you can delete from the drop down in the “Status” field.
IMPORTANT NOTE
If a customer goes to the checkout page then backs out to
the cart again the order totals may be shown as zero. This
is an incomplete order and hasn't been paid for. The only reason
they are left there is for the user's information,
such as if you see a lot of incomplete orders you might want to check why
customers are not going through with the purchase.
When the customer makes payment and returns to the site the
order is "closed". IF after making payment and returning
the order is not closed (you would notice there is still an "authorize" button
on the admin orders page) then you should check the setup of
your payment processor or ask for help on our support forums.
One thing to note, if you are using the email methods of checkout
and set emailorderstatus to less than 3 then the order will
not be closed properly as orders with status less than 3 are
not authorized - ASP
emailorderstatus - PHP
emailorderstatus.
MODIFICATION WARNING
If you see the message "Modification Warning" it means that the customer has gone back from checkout and modified their order. The order will be unauthorized so check with your payment provider to see if payment was actually made or not. This is particularly important where payment is made on the payment provider site where instead of going on to the store thanks page, the customer hits the back button to change the items in their cart.
Status: This is where you can set the status
of your order and the default options are unauthorized, cancelled,
deleted, authorized,
packing, shipping, shipped, completed. It is possible to change
these values in the Admin Order Status page to give a clearer
message to the public if they choose to view the status of their
order.
Tracking number: This is where you can enter the tracking number
for each order.
Invoice number: This is where you can enter the invoice number
for each order.
Purge deleted: Once an order is deleted, it will remain in the system for 3 days – this is a security measure in case an order is deleted by mistake. Selecting “purge deleted” will remove all trace of deleted orders.
At the bottom of the page it is possible to quickly flick through date ranges, for example, orders from a month ago, a week ago, yesterday etc.
Referrer: (Version 5.7.0 required) This is the referring URL that was clicked to reach your site. If an order doesn't show a referring URL, the most likely reason is that the address was typed directly into the browser or the referrer could not be determined.
Version 4.9.0 saw the introduction of the ability to edit all the clients' order details. To use this feature select Edit Order Details from the drop down menu and click on the name of the purchaser.
You will then be presented with the full order details in form fields. All of these can be edited but do remember to click on "recalculate" and "update" after making any changes.
If you need to edit one of the product options click on the box under Product ID and the Options field will appear with a drop down of available choices.
If you need to add more items to the order then click on the "+" button, to remove products click on the "-" button. Remember to recalculate the order after changes have been made.
From Version 6.8.1 the invoice and shipping fields will update on hitting the Return Key rather than clicking on an update button.
If you want to create the publicly viewable order status page then all you have to do is open the products.asp page in your web editor and "Save As..." orderstatus.asp
Then go to HTML view, and look for
<!--#include file="vsadmin/inc/incproducts.asp"-->
...and change it to...
<!--#include file="vsadmin/inc/incorderstatus.asp"-->
...for for the PHP version open the products.php page in your web editor and "Save As..." orderstatus.php
Then go to HTML view, and look for
<?php include "vsadmin/inc/incproducts.php" ?>
...and change it to...
<?php include "vsadmin/inc/incorderstatus.php" ?>
From version 4.5.0 it is possible to send an email to the customer once their order status has changed. From version 5.7.0 you can choose which order types will receive the email. The mail itself can be edited in the Email Messaging Admin page.
In Version 6.7 you can send emails to customers who abandoned their cart in an attempt to recover the order.
In the admin orders page, select Abandoned Carts from the Status drop down menu
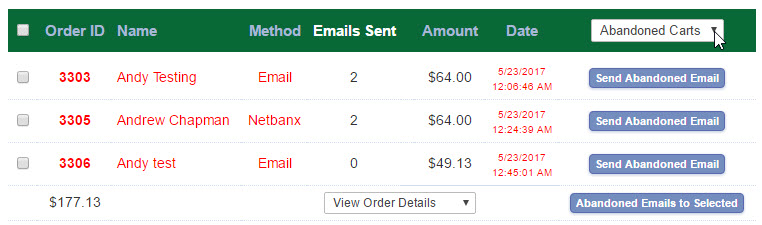
If you have any unauthorized orders they will be shown here with the header changing to green for the sake of clarity. Click on the Send Abandoned Email button to send a message to the customer so they can recover their cart and hopefully complete the checkout. The mail itself can be edited in the Email Messaging Admin page. You can select multiple orders and click on Abandoned Emails to Selected if you prefer.
The page will display the number of emails you have sent for each order with a maximum of three emails, you may want to change the text of successive emails and that can be edited in the Email Messaging Admin page too.
You can choose to filter the abandoned cart display by the number of emails sent to each by selecting from the choices in the left hand drop down menu
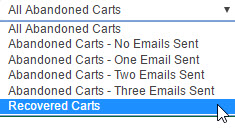
You can also display the recovered carts ie. those who have been sent an email and went on to complete the order.
If you are going to implement the Abandoned Cart feature we suggest a reasonable setting for Would you like to delete uncompleted orders? in the main admin settings page - something like 10 weeks or above.
Please Note that Amazon Pay orders which are unauthorized cannot be recovered. Customers will have had to enter their billing details to be able to recover the cart.