
Contact sales now: info@ecommercetemplates.com
Ecommerce Templates > General Help > The Control Panel > Content Management System (CMS)
The content management system built in to Ecommerce Template shopping cart software allows you to dynamically add content to your site through the online control panel. You can choose to add the content to existing pages, this might be in the form of news sections or special offers for example or you can set up a whole page content in a dynamic way - this will prove useful if you want to add articles about your products and services or want to control your home page content through the admin for example. The content management system has an optional built-in HTML editor with preview which makes formatting the content a breeze.
You will probably want to enable the HTML editor for the content regions as it makes formatting so much simpler. It provides a wysiwyg interface so adding tables, new paragraphs, colors etc can be made with a click or two. It also allows you to preview your work before submitting.
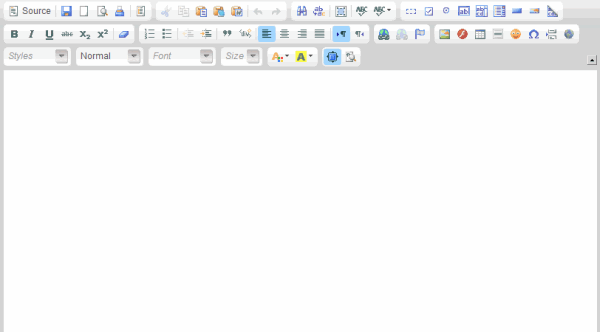
If you want to use the CKEditor HTML editor with the content management system, it can be downloaded?here. Upload the files to your server and then set the following in vsadmin/includes.asp for the ASP version
htmleditor="ckeditor"
or vsadmin/includes.php for the PHP version
$htmleditor="ckeditor";
If you want to use the Froala HTML editor with the content management system, it can be downloaded here. Upload the files to your server and then set the following in vsadmin/includes.asp for the ASP version
htmleditor="froala"
If you want to use the Froala HTML editor with the content management system, it can be downloaded here. Upload the files to your server and then set the following in vsadmin/includes.php for the PHP version
$htmleditor="froala";
Now log into your store control panel and click on the link for Content Management, then choose "New Content Region".
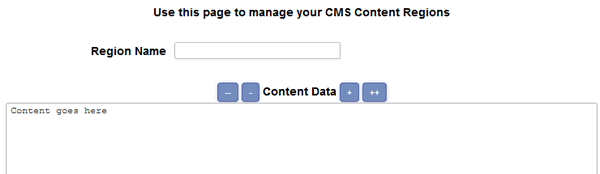
The field for Region Name is for internal use only so enter a descriptive title there like "Right News Section".
The -- - and + ++ buttons allow you to control the visual width of the content field. This won't affect the content as it is displayed on your pages but will make it easier to visualize narrow content in the admin.
In the content field, add the details you would like to appear on your pages. If you are using the FCK HTML Editor click on the downward arrow to view the available formatting choices.
Click on "Submit" to save your changes.
You should now see the content region(s) you have set up
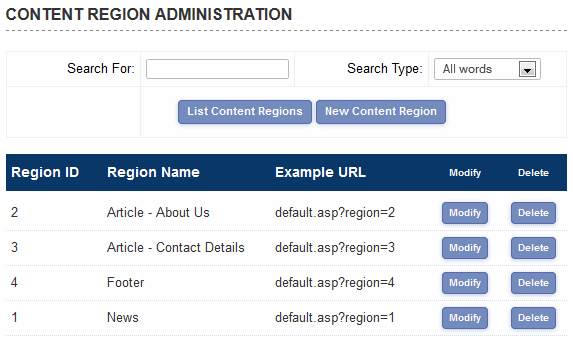
The Region ID is the identifier you are going to use to add the new content to your page. Open the store page and find the location where you want to add the new content. In code / HTML view add the following ...
ASP Version
<% regionid=1 %>
<!--#include file="vsadmin/inc/inccontentregion.asp"-->
PHP Version
<?php $regionid=1; ?>
<?php include "vsadmin/inc/inccontentregion.php" ?>
... where the regionid number corresponds to the identifier from the admin page shown above. In this example we would be adding the "News" content but if we were adding the "Footer" content, the regionid would be set to 4.
That's all there is to it. Now upload your page to the server and check the content is showing correctly. From now on, any modifications made to that region can be carried out through the store control panel.
NOTE: Make sure that those lines come somewhere after the 4 main ASP / PHP include lines on your page. If necessary you can move the other 4 lines further up the code to just after the opening <body> tag.
![]()
You may want to set up pages where the whole main content of a page is administered through the store control panel. In this example we are going to set up an articles section and use the content management system to populate the main body of the page.
First of all take an existing page on your site and save it as articles.asp or articles.php depending on which version you are using. Clear out the main body content so you are left with white space in the center of the page. In HTML / code view copy and paste the following:
ASP Version
<!--#include file="vsadmin/inc/inccontentregion.asp"-->
PHP Version
<?php include "vsadmin/inc/inccontentregion.php" ?>
Now go into your store control panel and follow the steps above for setting up a new content region like the "Article - About Us" example in the screenshot. Once you have added your text, and noted the regionid (in this case region 2), save your work and open the following page on your site
http://www.yourstoreurl.com/articles.asp?region=2
or
http://www.yourstoreurl.com/articles.php?region=2
You should see the content you have just added through the control panel within your design. You can now go on setting up more articles through the control panel and changing the "region=2" in the URL depending on the regionid associated to it in the content management admin page.
Using articles.asp or articles.php is just an example and you can name the page whatever you like as long as it is followed by the correct regionid number. For example you may end up with pages on your site like...
http://www.yourstoreurl.com/articles.asp?region=2
http://www.yourstoreurl.com/aboutus.asp?region=3
http://www.yourstoreurl.com/contactus.asp?region=4
http://www.yourstoreurl.com/news.asp?region=5
... or whatever you would like to call them.
You can add these dynamic pages and in fact any of your store pages to your menu system using the css dynamic menus also released in version 5.9.
![]()
Although it's not possible to put database driven content like the minicart or recently viewed items within the content regions, there is a very simple workaround. All you need to do is set up two regions and place the minicart or recently reviewed items box between the two.
In the ASP version the set up would be like this on your page if you wanted to have the recently reviewed box in the middle of the content regions:
<% regionid=6 %>
<!--#include file="vsadmin/inc/inccontentregion.asp"-->
<!--#include file="vsadmin/inc/increcentview.asp"-->
<% regionid=7 %>
<!--#include file="vsadmin/inc/inccontentregion.asp"-->
for the PHP version, that would be
<?php $regionid=6; ?>
<?php include "vsadmin/inc/inccontentregion.php" ?>
<?php include "vsadmin/inc/increcentview.php" ?>
<?php $regionid=7; ?>
<?php include "vsadmin/inc/inccontentregion.php" ?>
![]()
If you want to show an inline pop up on checkout of your terms and conditions for your customers to agree to, make a new content region with the region name "termsandcondtions" and then add your terms to the content field. You will require a minimum version of 6.9.2 and have the t&c feature turned on in includes.asp or includes.php - no other settings are required as the system will recognize the new content region from the region name.
To style the buttons on the terms and conditions inline pop up add this to your css file
div.termsandcondsbutton input.no-print{background:#cc0000;color:#fff;border:0}
div.termsandcondsbutton input.no-print:hover{color:#000}
and change the colors to match your preferences
![]()
There are two ways to add content regions to the product detail pages.
The first is to add a content region specifying the content region id. If you create your content region that you want to display, and that content region has a content region id of 32 then you would add the following to the detailpagelayout parameter...
contentregion32
The second is if you want a different content region based on the category. For that you just add this to the detailpagelayout parameter...
catcontentregion
Now, for the content you have to create a new content region for your category and the give it the Region Name of "catcontentregion" plus the category id. So for instance if the category you want to create content for has a category id of 12 then the Region Name you give your content region will be catcontentregion12
![]()
I get an error like "Data source name not found and no default driver specified" or the content of the page doesn't appear.
It's important that the 4 main ASP or PHP lines come somewhere before the inccontentregion include line. You can move the 4 ASP / PHP include lines further up the code, just after the opening <body> tag for example.
I can see the content management fields but there's no CKEditor HTML editor.
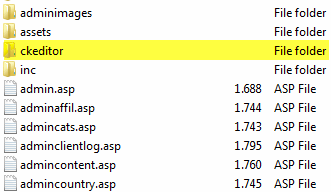
Make sure you have followed the steps here. If you are using two vsadmin folders for security or ssl reasons the htmleditor="ckeditor" or $htmleditor=ckeditor"; will need to be added to each includes file. Make sure the files have been uploaded to the correct location on the server by uploading the ckeditor folder to the vsadmin folder. Check the files have made it over to the vsadmin folder correctly so you should see a partial listing like this in the vsadmin folder...
... with the sceditor folder within the vsadmin folder. If you are using two vsadmin folders for security or ssl reasons, make sure you have uploaded the froala files to both.
I can see the content management fields but there's no Froala HTML editor.
Make sure you have followed the steps here. If you are using two vsadmin folders for security or ssl reasons the $htmleditor="froala"; will need to be added to each includes.php file or htmleditor="froala" to includes.asp. Make sure the files have been uploaded to the correct location on the server by uploading the froala folder to the vsadmin folder. Check the files have made it over to the vsadmin folder correctly so you should see a partial listing like this in the vsadmin folder...
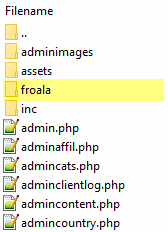
... with the froala folder within the vsadmin folder. If you are using two vsadmin folders for security or ssl reasons, make sure you have uploaded the froala files to both.
![]()