Contact sales now: info@ecommercetemplates.com
Ecommerce Templates > General Help > The Control Panel > Admin csv file upload
The CSV file upload page allows you to upload product information, product image details and mailing list entries.
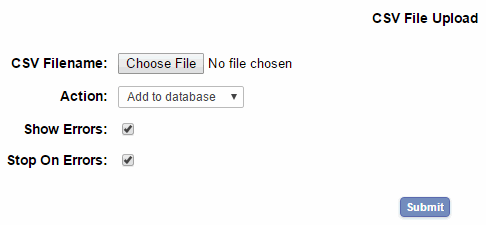
Once you have selected "CSV File Upload" from the Product Admin drop down menu you will be presented with the following screen.

CSV Filename
The file you upload must be a comma delimited file with a .csv file extension. The name of the file is not important but will typically be something like inventory.csv, productimages.csv or mailing.csv
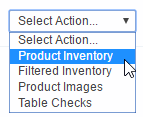
Action
Add to Database - choose this option if you are adding new products or images to your store
Update Database - choose this option if you are modifying existing products or images
Don't upload modifications and new products / images together in the same file - they must be uploaded separately.
Show Errors
If you want any errors in the files to be reported on screen, select this option.
Stop On Errors
If you want the upload process to stop if an error is encountered, select this option.
The best way to get started here is to download the product csv file from the product admin page.

This will give you the file of all the product information on your store, or if you have only just set up the store, all the sample products. It will provide a guide to the column headings available and the type of data required for each. The download file will be called inventory.csv and can be opened up in Excel - other csv file editors are available such as Ron's Editor. You should see all the column headers like pID, pName etc and that will guide you through the data and headings available.
The only required field is the Product ID (pID) but others like the pSell and pDisplay will usually need to be added so you can show a buy button for the product and display it on the store.
To get familiar with the csv file you might want to make an edit to the inventory.csv you have just downloaded and then choose "Update Database" when uploading it again. Remember that Add to Database is only used when you are adding new products, not modifying existing ones.
Be aware that the csv file is for small to medium sized files of around three to five thousand products. If you want to use a larger file, it is recommended breaking it down into smaller files and uploading those in batches.
The Product Image CSV file is separate from the main products csv file and needs to be uploaded separately too. To get familiar with the contents download the Product Images file from the product admin page, open productimages.csv and have a look at the headings and data shown.
When you open it up you'll see there are four columns
The csv file for product images must include the four columns names at the top: imageProduct imageSrc imageType imageNumber.
When uploading product image information, choose to add to database to add new images or update database to modify existing images.
The images themselves will need to be uploaded via your FTP program or via the built-in image upload feature in the product admin page.
Important note: Make sure when adding new images that they come somewhere after the existing product images in the file so images don't get deleted in later uploads. Also be careful with the value entered in the imageNumber field. If you don't want images to be deleted, make sure the value is higher than the existing one(s). If the image is to be replaced, enter the same or lower value.
From Version 6.6.0 email addresses can be imported into the store mailing list
Two columns are available - Email,Full Name - any other columns will be ignored
For this upload it doesn't matter if you select Add to Database or Upload Database, the results will be the same. If the email exists, the name is updated. If not then it is added along with the name and the email is set to confirmed.