
Contact sales now: info@ecommercetemplates.com
Ecommerce Templates > General Help > The Control Panel > Admin products options page
Product options allow your customers to choose specific attributes or add-ons for each product. This would typically be an item of clothing offered in various colors or a build your own computer system where the buyer can choose the processor, memory, monitor etc. Any price changes are shown in real time - it is also possible to plug-in the weight difference if applicable so shipping can be calculated correctly. Version 4.9.0 saw the introduction of a feature allowing the product option to have its own product id.
Select the “product options” link from the left hand menu of your control panel.
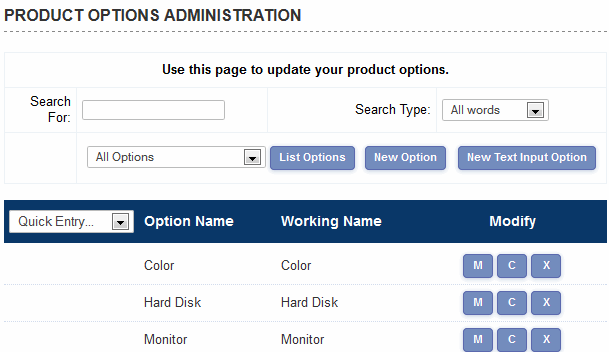
From this screen you can clone, modify or delete an existing product option or add a new one. There is also the possibility to add a New Text Input Option.
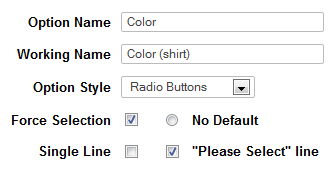
Click on New Option and you should see a screen with this at the top:
The Screen Explained
Option Name: This is the name that is displayed on the products page next to the product it relates to.
Working Name: This is for internal use only and helps identify the product option in the admin section. It may be that you have different product options for colors depending on the product eg different colors available for socks and shoes.
Option Style: Choose to show your product options as a drop down menu, radio buttons or Multiple Purchase.
The Multiple Purchase feature was introduced in Version 5.5.0 and allows customers to select different quantities of product options from the same page before adding them all to cart. It will appear on the product and / or product detail page like this:
The number of columns displayed is set in vsadmin/includes.asp or includes.php
No default: Select here if there is no default product option to be shown.
Single line: Select here if you want the options to appear on the same line rather than one below another. (This feature is not available for the multipurchase layout above where columns should be used for the layout choices).
"Please Select" line: If selected this will show the message "Please Select" before the product options. In Version 6.7 the Please Select line can be substituted for the option name with this addition to includes.asp or includes.php
Force Selection: Check this box if you want to force the customer to select a product option for the product they are purchasing.
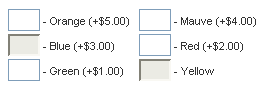
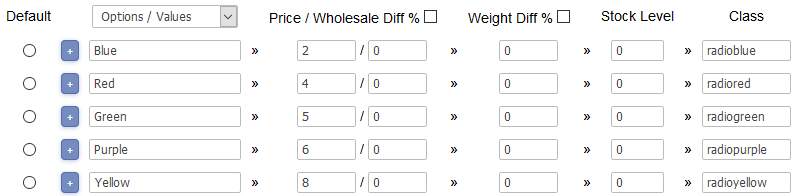
Below that box, you should see a screen like this
The Screen Explained
Click on the Plus button to enter a new product option anywhere in the list
Options / Values: These are the product options that will appear with the product it has been assigned to.
Price Diff: If there is a price difference associated to the product option then it can be added here. For example if the option costs $1 more than the base product price then place "1" in the Price Diff box. If the option costs 10% more than the base product price then check the percentage box and place "10" in the Price Diff box.
Wholesale Price: If you are using wholesale pricing and there is a difference in price involved then they can be entered here.
Weight Diff: If there is a weight difference associated to the product option then it can be added here. For example if the option weighs 1 kilo over the base product weight then place "1" in the Weight Diff box. If the option weighs 10% more than the base product weight then check the percentage box and place "10" in the Weight Diff box.
Class Introduced in ECT v7.0.1 you can enter a css class name to enable formatting of the product option display. Check our support forum for some handy tips.
Select Options / Alternates to continue configuring the product options

The Screen Explained
Alt Prod ID: Version 4.9.0 saw the introduction of this feature and version 5.7.0 a complete overhaul to improve functionality. The alt prod id feature allows you to assign a unique product reference to a product option by either creating a completely new id or modifying the existing product id.
This feature can be particularly useful in combination with stock management as you are able to control the inventory of individual items such as a setting stock on long-sleeved blue shirts rather than on the generic shirt product. It also means that each product id can have its own image associated without having to list them separately on the page.
We have set up a separate help page here that gives some background and samples of how this feature can be used.
Alt Image: From version 5.5.0 you can assign different images with the product option choices. This means that as a customer selects a product option the image will change accordingly. In this field you should place the path to the image you want to appear on the products page when an option is selected.
Alt Large Image: This is where you would place the path to the image that would show on the product detail page once an option has been selected.
Select Dependent Options if you want to choose an option dependent on a previous selection (Version 6.4 required)

Dependent product options allow your customers to select choices dependent on the previous option chosen. For example you may have different colors available depending on whether the customer chooses a matt or satin paint. Dependent options can be displayed as radio buttons or drop down menus and they will work with the Alt Prod ID feature outlined above.
Checkboxes as Product Options
From version 5.9, product options that are shown as radio buttons will automatically
become checkboxes if there is only one option. This enables selecting / deselecting
the option and also as a radio button has no sense for a single option as it cannot be
deselected. This enables very neat lists of Yes / No or Want / Don't want options
when set up this way or "Multiple Selection Lists".
Tools Tips
In version 6.5 we added the ability to add tool tips to the product options. You can add text, images and links to a pop up window that will appear next to the option. Any valid HTML can be used..
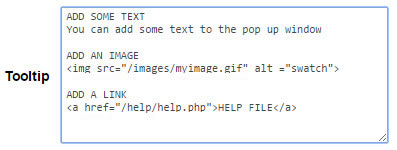
This will result in an icon appearing next to the option which will open up a window when clicked

The text input option is used when you need the customer to add some information regarding the product. This might be a personalized message added to the product or if you are selling domain names, the domain that the customer wishes to buy.
The Screen Explained
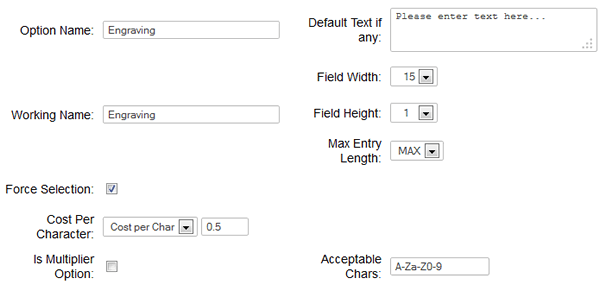
Option Name: This is the name of the option that will appear on your store.
Working Name: This is for internal use only and is useful when you have options that could have the same name.
Default Text if any: If you need to populate the field on the store then add the message here. If not then leave blank.
Force Selection: Check this box if you want to force the customer to add some text to the box.
Field Width: The width of the box that will appear on the store.
Field Height: If you set this to a number higher than one then you will create a multiline box, useful when loner input is required.
Max Entry Length: This is where you can limit the number of characters entered in the text input box. Choose between 1 and 255 characters.
Cost per character: If there is a charge involved you can choose between charging per character and for the whole entry.
Is Multiplier Option: If you have products sold by length for example, enter the value here and this will be multiplied by the base price of the product to get a final total.
Acceptable Chars: This is where you can define the characters you are going to permit in the text input field. Leave blank to accept any combination or choose from the following examples.
A-Za-z 0-9 - alphanumeric plus spaces
0-9\. - numbers plus decimal
A-Za-z !"$%\., - letters, space and symbols
Please note that some symbols are special in regular expressions and will need escaping so for a period / full stop you'd want to escape that like this \. and to accept the slash \\ or a dash \-
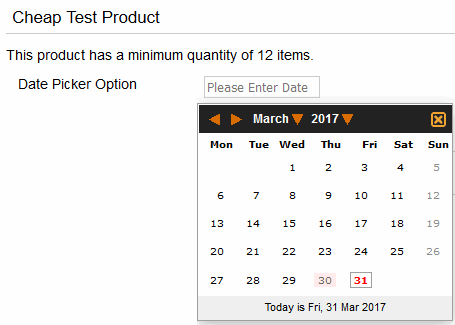
Date Picker (Version 6.7 required)
You can show a calendar option on the product and detail pages...
There are several tweaks you can make here
You can disable dates in the past by setting the following CSS...
div.ectcalpastdate{
pointer-events:none;
cursor:default;
opacity:0.6;
}
You can also include "today" in the non-selectable dates by setting the same for div.ectcaltoday.
Each day of the week also has its own CSS class, ectcaldayno0 to ectcaldayno6 where Saturday is ectcaldayno0, Sunday is ectcaldayno1 up to Friday which is ectcaldayno6. So using this you can disable weekends (for instance) by setting both ectcaldayno0 and ectcaldayno1 using the disabled CSS above.
You can also disable specific days, which may be holidays for example with this addition to includes.asp
ectpopcalendarjs="var ectpopcaldisabled='12-25;1-1;03-30';"
or in includes.php
$ectpopcalendarjs="var ectpopcaldisabled='12-25;1-1;03-30';";
The holiday dates should be in "mm-dd" format, separated by semi-colons.
By default the calendar week will start on Sunday, but you can start the week on Monday by setting this in includes.asp...
ectpopcalendarjs="ectpopcalstartmonday=true;"
or in includes.php
$GLOBALS['ectpopcalendarjs']="ectpopcalstartmonday=true;";
If you need to combine those parameters, the syntax would be like this for the ASP version
ectpopcalendarjs="ectpopcalstartmonday=true;var ectpopcaldisabled='12-25;1-1;03-30';"
or for PHP
$ectpopcalendarjs="ectpopcalstartmonday=true;var ectpopcaldisabled='12-25;1-1;03-30';";
if you need to change the date format from the default yyyy/mm/dd you can use the parameter ectcaldateformat where you can specify the date format using...
dd=Zero padded two digit date
d=One or two digit date
mmmm=Three letter date name
mmm=Full date name
mm=Zero padded month number
m=One or two digit month
yyyy=Four digit year
yy=Zero padded two digit year
So in vsadmin/includes.asp you could use....
ectcaldateformat="mm/dd/yy"
or in vsadmin/includes.php
$ectcaldateformat="mm/dd/yy";
Once you have set up the product options you need you can then assign them to their corresponding products. From the left hand menu select Product Admin and then Modify for the product that needs a new option. On the products admin page you should see a box where you can specify how many different product options (eg color, size) need to be assigned to the product.
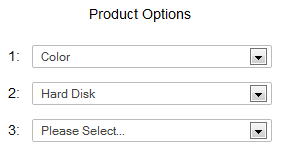
Once you assign the number then the corresponding number of drop down choices will appear so you can select the options that need to go with that product.
How can I hide the product options from the products page?
How can I hide the display of the price difference for the product options?
How can I hide the product options from the products page?
For the ASP version add noproductoptions=true to includes.asp ![]() more details
more details
For the PHP version add $noproductoptions=TRUE; to
includes.php ![]() more details
more details
How can I hide the display of the price difference for the product options?
For the ASP version add hideoptpricediffs=true to
includes.asp ![]() more details
more details
For the PHP version add $hideoptpricediffs=true; to includes.php ![]() more details
more details