ECT Hosted Store > How to create a new page with the Hosted ECT Store
The store pages like the products page, categories, cart, search, tracking etc are dynamically generated for you by the shopping cart software so you won't have to do anything to make those pages display. Non-store pages like the home page, about, company info etc will need setting up and we'll deal with how to do that here.
The first page you'll probably want to set up, at least with a working framework is your home page. Go to the admin design page of your store control panel and choose Body Content. You'll see three sample pages already defined, home, privacypolicy and termsandconditions.
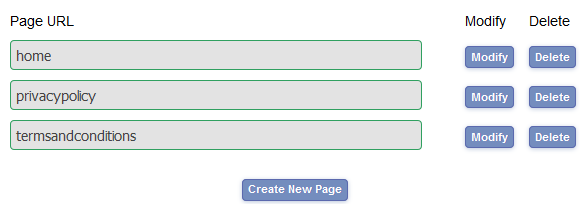
Click on the "Modify" button next to the home field and you will be presented with The Page URL field, the Page Title field and the Page Meta Description field followed by an editable section to add your content to.
In the Page Title field you already have the default, which is "home", and that should not be edited.
The Page Title field is used by search engines when indexing your site and users when they find your site in the search engine results pages therefore it's important to get this right. It should explain clearly what the site is about, probably include the company name and should read quite naturally (not just a list of keywords). You should try to keep it under about 60 characters in length as anything more is going to get cut off in the search listings.
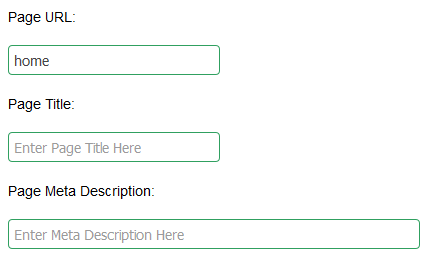
The Page Meta Description field is also used by search engines but not as a ranking feature but to accompany your title in the search engine listings. It is important therefore to write in plain language about the page content to entice users to click on your link - basically it should be a short summary of the page content, although for the home page this may be extended to include more general site content. You should aim for a meta description of fewer than 300 characters.
How you lay out your home page is completely up to you but here's a suggestion for getting things started. One common layout is to start with a large image at the top of the page so get an image ready that shows off what you do or what you sell. It should be at least 1200pixels wide and it will then adjust automatically to the screen size it is being viewed on (even on mobile devices). Make sure the image is optimized for the web - if you don't have a graphics program there are numerous online sites where you can upload an image and have it done automatically for you. Once it's ready click on the picture icon in the editor toolbar to insert the image. You can either drag it from your hard drive to the image field or click to upload. Once it appears, click on the Alternate Text icon and give it a short meaningful title - this helps search engines and is good for accessibility too. Finally click on the button Modify Page Body to save your work so far.
The next thing you might want to do is add some text, an introduction to the site, product line, company or whatever. To do that just click in the editor and start typing. If you want to add some header text, click on the code icon and just before the text you just entered add the HTML like this
<h1>My title text</h1> - for a smaller heading us <h2> or <h3> tags. Save the page again so as not to lose any of your work.

Finally you might want to display some of your products on the home page and you can do that via the cross selling feature. In the admin parameters page under the section Design / Layout Parameters make sure you have checked the option "Add the cross sell feature to the home page." and then choose Recommended Items or Best Sellers (or both) from the "Set the features and order for the cross sell features on the home page". Recommended products are ones which have the checkbox for "Recommended" checked in the admin products page so you can select which ones you want to appear by just checking that option. You can choose which elements to display in the cross selling display and in which order they should appear in the admin design page. We have more information on setting up the cross selling feature in the cross sell help page.
This is just a suggestion for adding home page content but can be used as a guide for getting things started.
![]()
You can set up as many non-store pages as you like but here's a guide to setting up an about page.
In the admin design page, click on the Body Content section then choose "Create New Page".
In the Page URL field, enter the text "about" so the address of this page will be http://www.yourstoreurl.com/about - the software is set up to use extensionless URLs so you shouldn't add .php or .html or whatever after the text. Use the guidelines above for the Page Title and Page Meta Description.

In the Page Body Content field enter the content of your about page and save. You can add your own formatting via the icons in the toolbar as well as uploading any images. For more advanced formatting see our notes here. Once saved you may want to add the new page to one or more of your menus and you can do that in the admin design page for the header, left navigation and / or footer.
![]()
Extensionless URLs are search friendly and clean URL formatting. As the name suggests they are URLs with no extension so no worrying about whether to add .php, .html, .htm or whatever. All the pages on the store are formed with no extension so your cart page is http://www.yourstoreurl.com/cart/ a product detail page would be in the form of http://www.yourstoreurl.com/my-product-name and any new pages you set up should be without an extension.
![]()
There are a couple of special cases when it comes to creating new pages. If you go to the Body Content section of the admin design page you'll see pages for Privacy Policy and Terms And Conditions. We have set these up for you with some sample content, where you can change the text in bold to reflect your company details and policies. You are of course free to delete our sample text and use your own. On the design you will find links to the privacy policy page and terms and conditions right at the bottom of the footer.
The terms and conditions content is also optionally used on checkout. In the admin parameters page under "Checkout Parameters" you'll see the option to choose "Show a terms and conditions acceptance checkbox on checkout." If selected customers will be forced to agree to the terms which will appear in a pop-up window in the checkout process. If you are going to use this feature make sure you don't edit the Page URL "termsandconditions" in the admin design body content section.
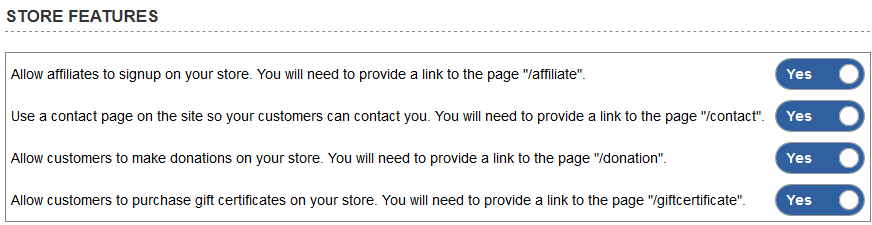
There are also four optional store pages, affiliates, contact, donations and gift certificates. To enable any of those pages go to the admin parameters page and under Store Features select the ones you want to show. If you choose to use any of these pages you will probably want to add them to one or more of your menus, and the link to each will be as follows (note they have no file extension)
Affiliates: /affiliate
Contact form: /contact
Donations: /donation
Gift certificates: /giftcertificate
When you add content to the home page or any of the non-store pages you are free to lay things out as you like. To make things simpler for people who prefer to get their hands dirty with some HTML and CSS we have provided some sample css classes you can use across the site.
First of all we have provided some css classes for a container and multiple columns - these are the available classes
For example if you wanted three equal columns on a page that degrade nicely on smaller screen sizes you would use the following in the code editor of the page.
<div class="ectcont">
<div class="ect3col">3 column content goes here.</div>
<div class="ect3col">3 column content goes here.</div>
<div class="ect3col">3 column content goes here.</div>
</div>
If you plan on using Google Maps or YouTube videos we also have some sample css so they will display nicely on smaller devices. Once you get the embed code from Google, YouTube or wherever, place them inside the following div tags
<div class="ect-iframe">
Embed code goes here
</div>
![]()