Contact sales now: info@ecommercetemplates.com
Ecommerce Templates > General Help > CSS layouts
Ecommerce Templates shopping cart software offers the ability to lay out the category, product and product detail pages without the use of tables. These pages are 100% css based giving greater flexibility over the styling and formatting of these pages.
We have outlined the various classes available below. If you would like to start with a full css file with sample layouts or blank css files containing just the classes added and no formatting, those are available from our downloads page.
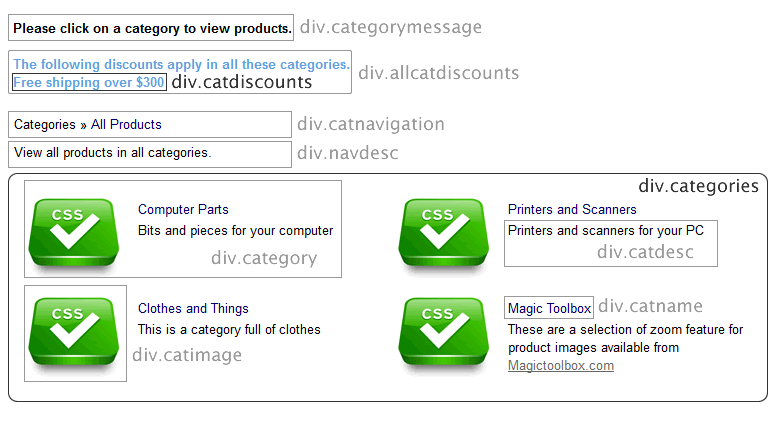
These are the classes available on the category page with some notes on their use:
div.categorymessage
This is the class for the top category text, by default that is "Please click on a category to view products."
div.allcatdiscounts
This class applies to both the discounts apply text and the discount itself
div.catdiscounts
This class only applies to the discount text
div.catnavigation
This is the top breadcrumb links eg. Categories >> All products
div.navdesc
This is the introductory text, typically "View all products in all categories."
div.categories
This is the main container for the category layout
div.category
This is the container for each category. If you want multiple columns, set a width and float left.
div.catimage
This is the image used for each of the categories
div.catname
This is the name of the category
div.catdesc
This is the category description
![]()
These are the classes available on the products page with some notes on their use:
div.catheader
This is the class for the optional category header available at the top of each products page.
div.prodnavigation
This is the top breadcrumb links eg. Categories >> All products
div.checkoutbutton
This is the the checkout button at the top of the listing
div.prodfilterbar
This is the product filter bar container which contains further classes, div.prodfilter, div.filtertext, select.prodfilter
div.allproddiscounts
This class applies to both the discounts apply text and the discount itself
div.proddiscounts
This class only applies to the discount text
div.products
This is the main container for the product page layout
div.product
This is the container for each product. If you want multiple columns, set a width and float left.
div.prodid
This is the product id styling
div.prodmanufacturer
This is the manufacturer label styling
div.prodsku
This is the sku label styling
div.prodimage
This is the container for the image used for each of the products
div.imagenavigator
This is the container for the multiple image display
div.prodname
This is the name of the product
div.prodrating
This is the product rating display on the products page
div.prodinstock
This is the number of items in stock labeling
div.proddescription
This is the short product description container
div.prodoptions
This is the container for the product options display
div.optiontext
The container of the options text
span.prodoption
The text preceding the option choices
div.option
The container for the menu options
select.prodoption
The menu options
div.multioptiontext
The text in the multiple purchase product option feature
div.listprice
The list price properties
div.prodprice
The main price properties
div.prodcurrency
The alternative currency properties
div.quantitydiv
The quantity box on the product page
div.addtocart
The container for the add to cart button
div.notifystock
The formatting of the notify in stock container
div.configbutton
The container for the configure button
div.outofstock
The container for the out of stock message
div.pagenums
The pagination numbers for multiple product pages
![]()
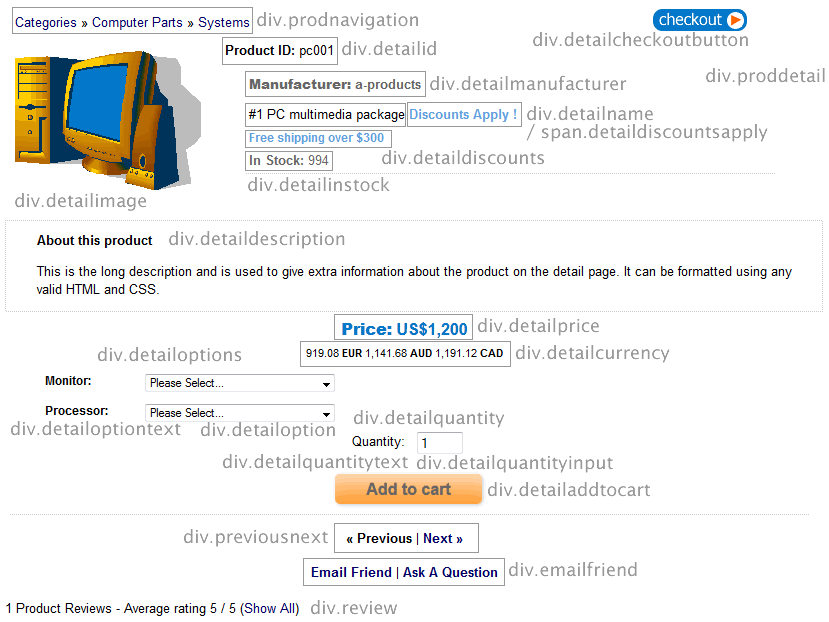
These are the classes available on the product detail page with some notes on their use:
div.proddetail
This is the main container for the product detail page layout
div.prodnavigation
This is the top breadcrumb links eg. Categories >> Category name
div.detailcheckoutbutton
This is the the checkout button at the top of the page
div.detailimage
This is the container for the product image on the detail page
div.detailimagenavigator
This is the container for the multiple image display
div.detailid
This is the product id styling on the detail page.
div.detailshortdescription
This is the short description on the detail page. (version 6.3 required)
div.detailcustom1 div.detailcustom2 div.detailcustom3
These are the custom fileds available in the product admin page, introduced in Version 6.3
div.detailmanufacturer
This is the manufacturer label styling
div.detailsku
This is the sku label styling
div.detailname
This is the name of the product
span.detaildiscountsapply
The formatting of the text "discounts apply!"
div.detaildiscounts
The formatting of the discount text
div.detailinstock
This is the number of items in stock labeling
div.detaildescription
This is the long product description container
div.detaillistprice
The list price properties
div.detailprice
The main price properties
div.detailcurrency
The alternative currency properties
div.detailoptions
The container for the product options on the product detail page
div.multioptiontable
The container for the multiple purchase product options
div.detailmultioptiontext
The formatting for the multiple purchase product options
div.detailoptiontext
The formatting of the options text
div.detailoption
The container for the drop down options
div.detailquantity
The container for the quantity box and text
div.detailquantitytext
The quantity box introductory text
div.detailquantityinput
The quantity box formatting
div.detailaddtocart
The formatting of the add to cart container
div.detailnotifystock
The formatting of the notify in stock container
div.detailoutofstock
The container for the out of stock message
div.previousnext
The pagination links at the bottom of the detail page
div.emailfriend
The container for the email a friend / ask a question feature
div.review
The container for the product review section
div.socialmedia
This is the container for the social media buttons
![]()
If you want to be able to order the elements on the product detail page, add the following to vsadmin/includes.asp, setting the order of your choice and choosing whichever elements you like from the list...
detailpagelayout="addtocart, addtocartquant, catcontentregion, contentregionX, currency, custom1, custom2, dateadded, description, discounts, instock, listprice, manufacturer, manufacturerlink, minquantity, navigation, options, previousnext, price, productid, productimage, productname, quantity, quantitypricing, reviews, reviewstars, reviewstarslarge, searchwords, shortdescription, sreviews, sku, socialmedia"
..or to vsadmin/includes.php
$detailpagelayout='addtocart, addtocartquant, catcontentregion, contentregionX, currency, custom1, custom2, dateadded, description, discounts, instock, listprice, manufacturer, manufacturerlink, minquantity, navigation, options, previousnext, price, productid, productimage, productname, quantity, quantitypricing, reviews, reviewstars, reviewstarslarge, searchwords, shortdescription, sreviews, sku, socialmedia';
The custom fields can be added to the list, also in the order of your choice. For these to appear you'll need to add custom1, custom2, custom3
If you want to include the keyword tags you would add this to the list searchwords
You can also add the rating stars on the detail page..
reviewstars
reviewstarslarge
Which will display the review stars in the same way as on the product pages.
If you want to include the quantity pricing display you would add this to the list quantitypricing
The date the item was added to the database can be displayed with the addition of dateadded. If you also want to add a label next to the date use
dateaddedlabel="Product added to store"
or for the PHP version
$dateaddedlabel="Product added to store";
You can add social media buttons to the product detail page css layout. You will need a minimum of Version 6.6 and add this to the list socialmedia.
For full details of how to display the social meda buttons, please visit the social media help page.
A minimum quantity message can be shown by adding minquantity to the list. The minimum quantity itself is defined in the Quick Entry drop down on the main product admin listing.
You can add content regions to the product detail page and there are two ways of achieving that.
The first is to add a content region specifying the content region id. If you create your content region that you want to display, and that content region has a content region id of 32 then you would add the following to the detailpagelayout parameter above...
contentregion32
The second is if you want a different content region based on the category. For that you just add this to the detailpagelayout parameter...
catcontentregion
For the content you have to create a new content region for your category and the give it the Region Name of "catcontentregion" plus the category id. So for instance if the category you want to create content for has a category id of 12 then the Region Name you give your content region will be
catcontentregion12
![]()
If you want to be able to order the elements on the products page, add the following to vsadmin/includes.asp, setting the order of your choice and choosing whichever elements you like from the list...
productpagelayout="addtocart, addtocartquant, currency, custom1, custom2, dateadded, description, discounts, instock, listprice, manufacturer, minquantity, options, price, productimage, productid, productname, quantity, quantitypricing, reviewstars, sku"
..or to vsadmin/includes.php
$productpagelayout='addtocart, addtocartquant, currency, custom1, custom2, dateadded, description, discounts, instock, listprice, manufacturer, minquantity, options, price, productimage, productid, productname, quantity, quantitypricing, reviewstars, sku';
You can choose which elements to show or remove from the list and the order in which they appear.
By adding "detaillink" to the productpagelayout / $productpagelayout parameter you can specify the Product Detail Link. The product detail link by default will be displayed as a link, but by setting the parameter "imgdetaillink / $imgdetaillink" to the path of an image it will display as an image. If you set the parameter imgdetaillink="button" / $imgdetaillink="button"; then an HTML button will be generated.
A minimum quantity message can be shown by adding minquantity to the list. The minimum quantity itself is defined in the Quick Entry drop down on the main product admin listing page.
![]()
You can choose which elements to display in the cross selling with the following in vsadmin/includes.asp
csproductpagelayout="productimage,productname,options,price,addtocart"
or in includes.php
$csproductpagelayout='productimage,productname,options,price,addtocart';
..where you can choose any of the elements from the product page layout to add to the list.
![]()
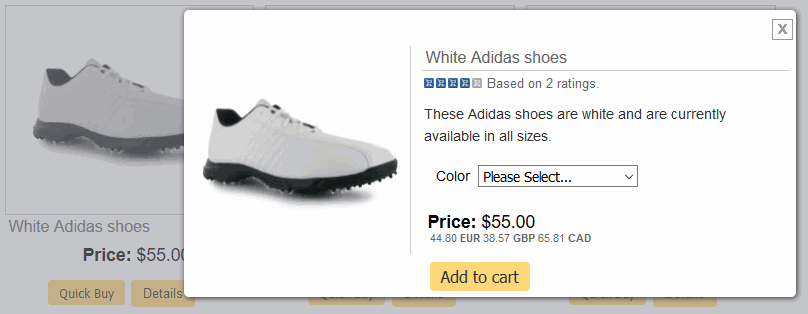
You can add a Quick Buy button to the products. This will display a pop up of the product information and means that the customer doesn't have to click through to the detail page to see the full details of an item. It can also appear in the cross selling items meaning that you can have this feature on your home page, cart page or wherever you like really.
To enable the feature you would add "quickbuy" to the productpagelayout parameter, like this for example in vsadmin/includes.asp
productpagelayout="productimage, productid, productname, discounts, reviewstars, instock, price, options, quickbuy"
or in includes.php
$productpagelayout='productimage, productid, productname, discounts, reviewstars, instock, price, options, quickbuy';
You will also want to define which elements you want to appear in the pop up window, and in which order. You can do that using the following in vsadmin/includes.asp
quickbuylayout="productimage, productname, productid, sku, manufacturer, discounts, dateadded, reviewstars, instock, description, listprice, price, currency, addtocartquant, detaillink"
or in includes.php
$quickbuylayout='productimage, productname, productid, sku, manufacturer, discounts, dateadded, reviewstars, instock, description, options, listprice, price, currency, addtocartquant, detaillink';
A minimum quantity message can be shown by adding minquantity to the list. The minimum quantity itself is defined in the Quick Entry drop down on the main product admin listing page.
Please Note
Options cannot be defined in both the productpagelayout parameter and the quickbuylayout parameter. Also if you want options to appear in the Quick Buy window, make sure they are not set in the product option admin page to "Detail Page Only".
Here is an example of how the product page could be laid out
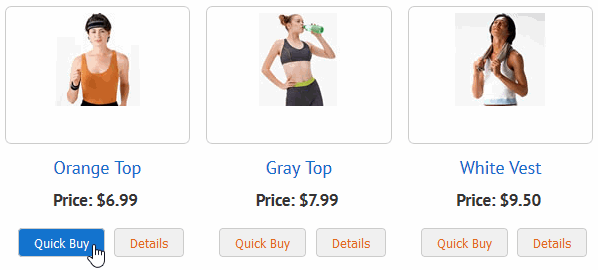
...and this is an example of the window after clicking on the Quick Buy button
If you need different formatting from the product page you can target the quick buy screen using css like this for the product image and product name for example
div.qbuywrapper div.prodimage{
border:0px;
width:200px;
border-right: 1px solid #ccc;
float:left;
}
div.qbuywrapper div.prodname{
float:right;
width:60%;
border-bottom:1px solid #ccc;
text-align:left;
margin-top:12px;
}
You can view an example on our Wordpress demo store.
If you only want to show the Quick Buy button on the cross selling products and not on the main products page, we have some help on that in our Home Page Display help page.
![]()
These are some answers to some of the most commonly asked questions regarding the css layouts for the category, product and details pages.
No, if you choose to use the css layouts these settings will be ignored. To set multiple columns on the product page for example set the width of the container div.product to something like 360 pixels and float left. This will cause the columns to repeat, fitting into the width of the main container.
The best way we have found is to use the Developer Toolbar for Firefox. We have a video tutorial available here on the subject.
Yes, you can. There are elements that appear across the category, product and detail pages that you may want to style in the same way. For example the class optiontext is used on the product and detail pages. If the formatting is the same, you only need to use this class and not redefine it for the detail page. Similarly there may be elements that need the same formatting such as the location of the buy button, out of stock message and notify me button. Rather than identifying the classes separately, you can group them like this
div.addtocart, div.outofstock, div,notifystock{
text-align:center;
float:left;
width:350px;
}
This is the list of CSS classes used for formatting the elements on the category, product and detail pages. There are many more classes for styling elements available on our main css help page.
The custom fields were added in version 6.3 and will appear in the product admin page once they have been added to includes.asp / includes.php. If you want to add labels to the fields you'll need the following in vsadmin/includes.asp
detailcustomlabel1="Custom Title 1 "
detailcustomlabel2="Custom Title 2 "
detailcustomlabel3="Custom Title 3 "
or in includes.php
$detailcustomlabel1="Custom Title 1 ";
$detailcustomlabel2="Custom Title 2 ";
$detailcustomlabel3="Custom Title 3 ";
For the product page you would use
prodcustomlabel1="Custom Title 1 "
prodcustomlabel2="Custom Title 2 "
prodcustomlabel3="Custom Title 3 "
or in includes.php
$prodcustomlabel1="Custom Title 1 ";
$prodcustomlabel2="Custom Title 2 ";
$prodcustomlabel3="Custom Title 3 ";
To add these labels in the product admin page use
admincustomlabel1="Custom Title 1 "
admincustomlabel2="Custom Title 2 "
admincustomlabel3="Custom Title 3 "
or in includes.php
$admincustomlabel1="Custom Title 1 ";
$admincustomlabel2="Custom Title 2 ";
$admincustomlabel3="Custom Title 3 " ;
![]()