Ecommerce Templates > General Help > Mini cart set up
Mini cart overview
The mini cart is a plug-in that will show a summary of the contents of your cart on each page that you
decide to include it on. From version 4.9.0 it will also display the estimated shipping
cost if required. The set up is quite straightforward but follow
the instructions carefully all the same. It is available for purchase
here if it
is not already included in the template design or if you prefer to have a css one line or multi-line version. The help file for the css minicart can be found here.
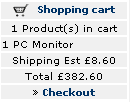
Mini cart screenshot
ASP Version
Follow the steps below for the mini cart to appear on your pages.
- Place the file incminicart.asp in your vsadmin/inc/ folder (if not already present)
- Place the file littlecart1.gif in your main images folder (if not already present)
- Place this line in HTML / code view where you want the mini
cart to appear, do make sure there is space below the box as
it will expand as more products are added to the cart.
<!--#include file="vsadmin/inc/incminicart.asp"-->
- If you are placing the mini cart on one of the store pages
ie affiliate.asp, cart.asp, categories.asp, clientlogin.asp,
orderstatus.asp prodetail.asp, products.asp, search.asp, sorry.asp
and thanks.asp make sure that the line above comes somewhere
in the code after the other include lines, which are:
<!--#include file="vsadmin/db_conn_open.asp"-->
<!--#include file="vsadmin/inc/languagefile.asp"-->
<!--#include file="vsadmin/includes.asp"-->
<!--#include file="vsadmin/inc/incfunctions.asp"-->
If you are placing it on a non-store page like about.asp
then you will need to add those above 4 lines and the mini cart
include line where it has to appear, like this:
<!--#include file="vsadmin/db_conn_open.asp"-->
<!--#include file="vsadmin/inc/languagefile.asp"-->
<!--#include
file="vsadmin/includes.asp"-->
<!--#include file="vsadmin/inc/incfunctions.asp"-->
<!--#include file="vsadmin/inc/incminicart.asp"-->
- Double check your code to make sure you have only one instance of these lines
<!--#include file="vsadmin/db_conn_open.asp"-->
<!--#include file="vsadmin/inc/languagefile.asp"-->
<!--#include file="vsadmin/includes.asp"-->
<!--#include file="vsadmin/inc/incfunctions.asp"-->
on the page.
- Open the file vsadmin/inc/languagefile_en.asp
and add these lines if they are not already there.
xxMCCO="Checkout"
xxMCSC="Shopping cart"
xxMCIIC="Product(s) in cart"
- Open your CSS file, typically called style.css and add these lines
TD.mincart {
font-size: 10px;
font-family : Verdana;
}
P.mincart {
font-size: 10px;
font-family : Verdana;
}
- Upload the page(s) to your server and check that it shows correctly.
If you receive any kind of error message then please check the
troubleshooting guide.

PHP Version
Follow the steps below for the mini cart to appear on your pages.
- Place the file incminicart.php in your vsadmin/inc/ folder
- Place the file littlecart1.gif in your main images folder
- Place this line in HTML / code view where you want the mini
cart to appear, do make sure there is space below the box as
it will expand as more products are added to the cart.
<?php include "vsadmin/inc/incminicart.php" ?>
- If you are placing the mini cart on one of the store pages
ie affiliate.php, cart.php, categories.php, clientlogin.php,
orderstatus.php prodetail.php, products.php, search.php, sorry.php
and thanks.php make sure that the line above comes somewhere
in the code after the other include lines, which are:
<?php include "vsadmin/db_conn_open.php" ?>
<?php include "vsadmin/inc/languagefile.php" ?>
<?php include "vsadmin/includes.php" ?>
<?php include "vsadmin/inc/incfunctions.php" ?>
If you are placing it on a non-store page like about.php then you will
need to add those above 4 lines and the mini cart
include line where it has to appear, like this:
<?php include "vsadmin/db_conn_open.php" ?>
<?php include "vsadmin/inc/languagefile.php" ?>
<?php include "vsadmin/includes.php" ?>
<?php include "vsadmin/inc/incfunctions.php" ?>
<?php include "vsadmin/inc/incminicart.php" ?>
Make sure that at the top of the page you have this code with absolutely no spaces
before it
<?php
session_cache_limiter('none');
session_start();
ob_start(); ?><html>
- Double check your code to make sure you have only one instance of these lines
<?php include "vsadmin/db_conn_open.php" ?>
<?php include "vsadmin/inc/languagefile.php" ?>
<?php include "vsadmin/includes.php" ?>
<?php include "vsadmin/inc/incfunctions.php" ?>
on the page.
- Open the file vsadmin/inc/languagefile.php and add these lines if they are not already there.
$xxMCCO="Checkout";
$xxMCSC="Shopping cart";
$xxMCIIC="Product(s) in cart";
- Open your CSS file, typically called style.css and add these lines
TD.mincart {
font-size: 10px;
font-family : Verdana;
}
P.mincart {
font-size: 10px;
font-family : Verdana;
}
- Upload the page(s) to your server and check that it shows correctly.
If you receive any kind of error message then please check the troubleshooting
guide.
CSS Classes
The formatting of the text for the mini cart is achieved through two classes that will need to be added to style.css:
TD.mincart {
font-size: 10px;
font-family : Verdana;
}
P.mincart {
font-size: 10px;
font-family : Verdana;
}
This will give you a ten pixel Verdana font for all the text within the mini cart box.
If you would like to change the background color of the mini cart then add a line like this:
TD.mincart {
font-size: 10px;
font-family : Verdana;
background-color: #CC0000;
}
If you want different link properties from
the rest of your main links, use something like this
a.mincart:link
{
color: #006699;
text-decoration: none;
font: 11px Tahoma, Arial, Helvetica, sans-serif;
}
a.mincart:visited
{
color: #006699;
text-decoration: none;
font: 11px Tahoma, Arial, Helvetica, sans-serif;
}
a.mincart:active
{
color: #FFFFFF;
text-decoration: none;
font: 11px Tahoma, Arial, Helvetica, sans-serif;
}
a.rightlinks:hover
{
color: #FFFFFF;
text-decoration: none;
font: 11px Tahoma, Arial, Helvetica, sans-serif;
}
Troubleshooting
The most common errors regarding the set up of the
mini cart are the following:
- The mini cart must go on a page with a .asp or .php extension depending on the version you are working from eg example.asp
/ example.php and not example.html or example.htm
- The mini cart include line must come after the
other 4 ASP or PHP include lines. If placing the mini cart is a problem then
the other 4 include lines can be moved up the code.
- The ASP or PHP include lines should not be duplicated on the
page, if you receive an error then do check that there is only
one instance of each.
- The path to the incminicart include is not correct. For example
if you have the added the include line to a Dreamweaver library
file (.lbi) or Template file (.dwt) then the path for the ASP
version will probably be
<!--#include file="../vsadmin/inc/incminicart.asp"-->
- If you enter the site using http://yourdomain.com and are then
switched to the www domain when clicking on the cart link in
the minicart, the main cart may well appear as empty because
the cookie hasn't been copied across. To get round this, find
this code at the top of your .php pages
<?php
session_cache_limiter('none');
session_start();
ob_start(); ?>
..and change it to
<?php
ini_set("session.cookie_domain", ".yourdomain.com");
session_cache_limiter('none');
session_start();
ob_start(); ?>
Remember to change .yourdomain.com to your own domain.