Contact sales now: info@ecommercetemplates.com
Ecommerce Templates > General Help > Dynamic Spry Tabs
The dynamic spry tabs allow you to add dynamic content to the product detail page by showing off your product descriptions in tabbed content that you users can access as they choose.
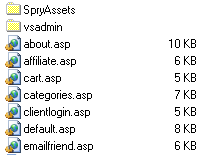
To use the spry tabs you will need to download the static-tabs.zip file available from our downloads page and then upload the content of the zip file to your server.
Now open proddetail.asp or proddetail.php in your HTML editor and somewhere before the closing </head> tag, add the following
<link href="SpryAssets/SpryTabbedPanels.css" rel="stylesheet" type="text/css" />
<script src="SpryAssets/SpryTabbedPanels.js" type="text/javascript"></script>
Please note, for WordPress users you do not need to upload the Spry files or add the header tags. Just to to the WP Admin -> Appearance -> Customize -> ECT Theme Options and select the option, "Yes, add Spry Tabs".
If you want to get started quickly and add one just tab labeled "description", set the following in vsadmin/includes.asp
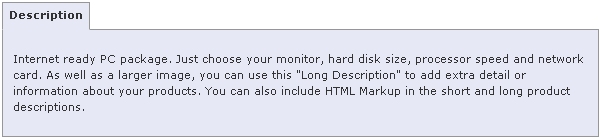
defaultdescriptiontab="<ecttab title=""Description"">"
or in includes.php
$defaultdescriptiontab='<ecttab title="Description">';
This will give you a one tab layout like this
If you want to add reviews and related products tabs to that, go on to the dynamic section here.
If you want to set up your own tabs manually, log into your control panel and open the product admin page to select the product you want to add the spry tab to. In the long description field copy and paste the following (if using the HTML editor, make sure they are pasted into the source code window).
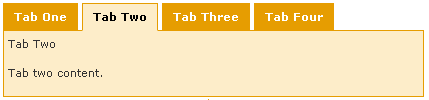
<ecttab title="Tab One">
Tab One
<p>Tab one content.</p>
<ecttab title="Tab Two">
Tab Two
<p>Tab two content.</p>
<ecttab title="Tab Three">
Tab Three
<p>Tab three content.</p>
<ecttab title="Tab Four">
Tab Four
<p>Tab four content.</p>
That will give you a panel with 4 tabs, which should look something like this
If you want more tabs, you can be adding more lines, for example
<ecttab title="Tab Five">
Tab Five
<p>Tab five content.</p>
The color and dimensions of the tabbed panel is governed by the css file, SpryTabbedPanels.css
If you need to center the panel on your page, add the following to your css file
div.detaildescription { width: 600px; margin: 0 auto;}
If you would prefer a panel where the content slides in, the set up is slightly different (view demo)
Download the sliding-tabs.zip file available from our downloads page and then upload the content of the zip file to your server.
Now open proddetail.asp or proddetail.php in your HTML editor and somewhere before the closing </head> tag, add the following
<link href="SpryAssets/spry_home_image.css" rel="stylesheet" type="text/css" />
<script type="text/javascript" src="SpryAssets/SpryDOMUtils.js"></script>
<script type="text/javascript" src="SpryAssets/SpryEffects.js"></script>
<script type="text/javascript" src="SpryAssets/SprySlidingPanels.js"></script>
There are 3 css files available in the download, depending on the type of tabs you are going to use
If you are going to use images for the tabs - use the following
<link href="SpryAssets/spry_home_image.css" rel="stylesheet" type="text/css" />
If you are going to use css background tabs - use the following
<link href="SpryAssets/spry_home_bgtabs.css" rel="stylesheet" type="text/css" />
If you are going to use css colored tabs - use the following
<link href="SpryAssets/spry_home_colors.css" rel="stylesheet" type="text/css" />
You will now need to add the following to vsadmin/includes.asp
ecttabs="slidingpanel"
or to vsadmin/includes.php
$ecttabs="slidingpanel";
Now log into your control panel and open the product admin page to select the product you want to add the spry tab to. In the long description field copy and paste the following (if using the HTML editor, make sure they are pasted into the source code window).
<ecttab title="Tab One">
Tab One
<p>Tab one content.</p>
<ecttab title="Tab Two">
Tab Two
<p>Tab two content.</p>
<ecttab title="Tab Three">
Tab Three
<p>Tab three content.</p>
<ecttab title="Tab Four">
Tab Four
<p>Tab four content.</p>
The color and dimensions of the tabbed panel are governed by the css file, which includes comments relating to each available class.
If you need to center the panel on your page, add the following to your css file
div.detaildescription { width: 600px; margin: 0 auto;}
It is possible to add the dynamic product reviews and related items features to the tabbed panels (view demo)
If you would like to add products reviews and related items, you'll need the following addition to vsadmin/includes.asp
ecttabsspecials="<ecttab title=""Reviews"" special=""reviews""><ecttab title=""Related"" special=""related"">"
or to vsadmin/includes.php
$ecttabsspecials='<ecttab title="Reviews" special="reviews"><ecttab title="Related" special="related">';
You can format the related items to suit your needs with this addition to vsadmin/includes.asp
relatedtabtemplate="<div class=""reltabimage"">%img%</div><div class=""reltabname"">%name%<br>Price: %price%<br></div><div class=""reltabdescription"">%description%</div>"
or to vsadmin/includes.php
$relatedtabtemplate='<div class="reltabimage">%img%</div><div class="reltabname">%name%<br>Price: %price%<br></div><div class="reltabdescription">%description%</div>';
...which will give you a related layout like this
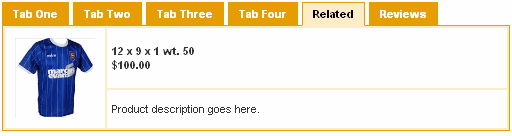
The following parameters are available
%img%
%name%
%id%
%price%
%description%
By default the related and reviews will come after the other tabs but you can place them at the beginning by adding the %tabs% parameter for where the other tabs should be, for example
ecttabsspecials="<ecttab title=""Reviews"" special=""reviews""><ecttab title=""Related"" special=""related"">%tabs%"
...or the other tabs can come between them
ecttabsspecials="<ecttab title=""Reviews"" special=""reviews"">%tabs%<ecttab title=""Related"" special=""related"">"
If the product has no related items, the related tab will not be shown.
In Version 6.5 you can add a Quantity Pricing tab like this
ecttabsspecials="<ecttab title=""Quantity Pricing"" special=""quantitypricing"">"
or to vsadmin/includes.php
$ecttabsspecials='<ecttab title="Quantity Pricing" special="quantitypricing">';
In the example above we have used text based tabs but you can replace those with images.
You will need to prepare two images for each of the tabs, one that you view and one that will change on mouse over.
All you need to do then is to change
<ecttab title="Tab One">
to
<ecttab title="Tab One" imgov="images/tab1_ov.png" img="images/tab1.png">
... where tab1.png is the tab that shows when first viewed and tab1_ov.png is the mouse over state.
These are the css classes that can be used in the tabbed panels for related products depending on whether you are using a table based layouts for the products or css based.
td.reltabname / div.reltabname - the container that holds the product name
td.reltabdescription / div.reltabdescription - the container for the product description
table.reltab / table.reltab - the main container properties
td.reltabimage / td.reltabimage - the container for the product image
img.reltabimage - the product image properties in the related products panel.
Additional classes can also be added by adding the "class=" attribute to the <ecttab> tag. This can be especially useful for font-awesome glyphs. For instance...
<ecttab title="Search Tab" class="fa fa-search">This tab will show a search icon