
Contact sales now: info@ecommercetemplates.com
Ecommerce Templates > General Help > The Control Panel > Admin category set up
The multiple category system allows you tailor your store set up to meet the needs of your product requirements. Products can be added to several categories if necessary and you can have categories with the same name on your store but differentiate between them in your control panel by assigning unique "working names".
Select the “categories” link from the left hand menu of your control panel.
The Screen Explained
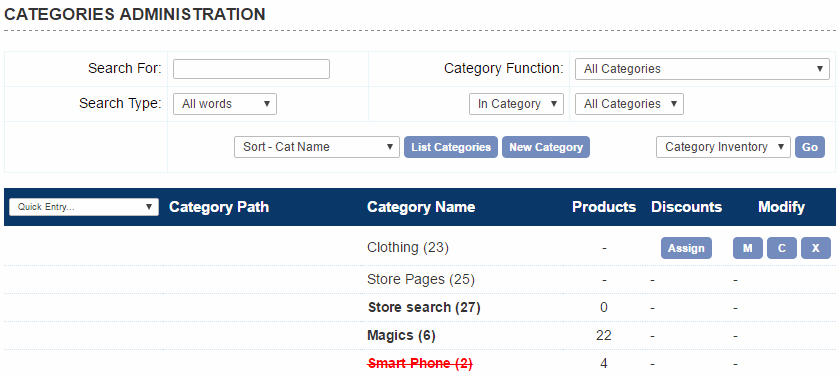
Quick Entry: Choose from the drop down options to modify multiple category features without having to open each category individually.
Order Category Path: This will give you the hierarchy of your category set up. The drop down option on the left allows you to order the categories on your store.
Category Name: This is the working name assigned to your category – it may be different from the name that appears on your store depending on the naming system you have chosen. Text in bold denotes a category that can have products added to it. The number in brackets (15) refers to the category id and is useful when manually setting up links on the store. A category name with an overline and underline denotes the product category root, more information can be found here.
Products: The number of products assigned to that particular category.
Discounts: Option to assign a Discount
Modify: Modify (M) the properties of the Category or clone (C) or delete (X) the category
Quick Entry: You can modify all the category elements without having to go into each individual category admin page. Choose the element you want to edit from the drop down choices, make your edits then hit the submit button. You can also view the category images associated with each category.
Click on the New Category button
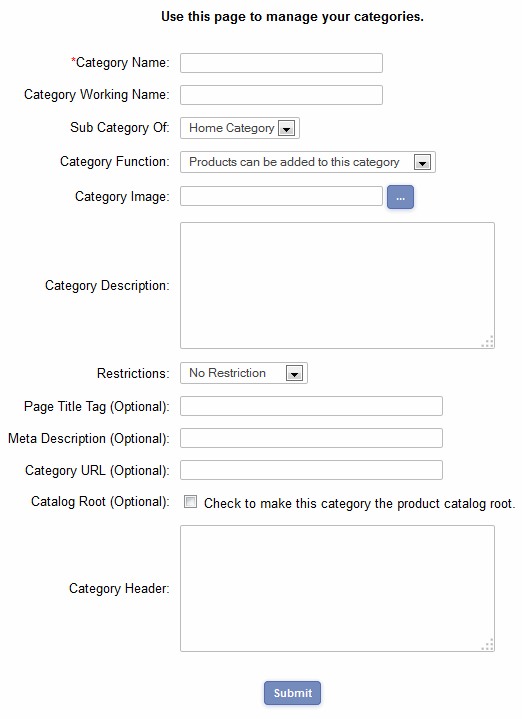
The Screen Explained
Category Name: This is the name of the category that will appear on your store.
Category Working Name: This is for internal use only and is useful when you have categories that could have the same name.
Sub Category Of…: This drop down allows you to choose the category above the one you are adding. In the example above, "Polos" will be a sub-category of "Clothing".
Category Function: There are two options when setting up a new category. The category may have products added to it, in this case select “Products can be added to this category”. If there are to be further sub-categories in the hierarchy then select “Categories can be added to this category”. It will not be possible to add a product to a category that has subsequent sub-categories.
Category Image: This is an optional field where you would place the path to the image to accompany the category name.
Category Description: Also optional if you would like to describe the category to your users. It is possible to add HTML to this field.
Restrictions: This is an optional field where you can set the login level to be used in conjunction with the client login feature. It is also possible to disable a category (and all their products) rather than delete it so it can be put back at a later date.
Page Title Tag: This is an optional field and is used in conjuntion with the search engine friendly features. Enter the title of the page you want to appear on the corresponding product / category page. We recommend a maximum of about 60 charcters in the field.
Meta Description: This is an optional field and is used in conjuntion with the search engine friendly features. Enter the description of the page you want to appear on the corresponding product / category page. We recommend a maximum of about 160 charcters in the field.
Category URL: Also optional if you would like to specify the static URL of the category which would have been set up using the search engine friendly features. This now means that your menu system won't pick up on the dynamic URLs as the store is browsed. It also works with the DHTML and CSS menus and avoids duplicate URLs / content on the store.
Catalog root: This is used in conjunction with the content management system and css menus introduced in version 5.9. If you aren't going to use those features, you can ignore this setting. If you want to read more on its use, visit our help page on css menus.
Category header: From Version 6.2 you can add a header section to each category which contains products. This can be handy for search engine purposes, adding banners or simple introductory text. In Version 6.7 this was expanded to allow headers for categories which contain sub-categories.
Products can only be added to the last category in your hierarchy - these are shown in bold type in your categories admin page. Be sure that when creating sub categories you don’t get into a loop of categories when the "Top Category" of one of your categories links back to one of its own sub categories. If this occurs you will see the error message “LOOP”. You must fix this before adding more categories / products.