Contact sales now: info@ecommercetemplates.com
Ecommerce Templates > PHP Version Help > Payment Processors > Cybersource

Cybersource allows you to take credit card payments through your Ecommerce Templates store. The processing of the credit cards is carried out completely by Cybersource so you don't have the worry and stress of storing or sending sensitive customer details. You are advised to have an SSL certificate installed on your server as although the transaction takes place on the Cybersource secure server, you may get a security warning in your browser if switching between http and https pages.
Once you have created your account with Cybersource the first thing you will need to do is download the file cybersourcephp.zip from our downloads page. The zip file contains two files, customppsend.php and customppreturn.php. These contain all the information you need for the Cybersource integration for Ecommerce Templates. Unzip the download and place the two files in your vsadmin/inc/ folder, overwriting the existing files - agree to overwrite if prompted.
There is also a file called updatestore.php, upload that to your store root and then open the page www.yourstoreurl.com/updatestore.php - you should see the message "All Done" and there is nothing more to do there other than delete that file from your server once opened.
Firstly log in to your Cybersource Business Center
Please note, if you wish to run test transactions you need to setup a test profile and to do that you would use the following URL to access the Cybersource Business Center - https://ebctest.cybersource.com/
In the left hand menu, click on "Tools & Settings" and then under "Secure Acceptance" click on "Profiles". If that menu is not available, you may have to ask Cybersource to enable Secure Acceptance on your account.
You should now see about 8 options displayed, including...
General Settings, Notifications, Payment Settings and so on.
Click on the "Payment Settings" option...
Here you enter the card types that are supported so click on "Add/Edit Card Types" to do so.
Once you have added the card types, you have to click on the pencil icon at the end of the "Supported Currencies" column. Here add the currency you wish to support (for instance USD) and add to the "Enabled" column. Having "CVN Required" is recommended to require the use of the CVV code.
Click "Save" to save the changes in the Payment Settings screen.
Click on the "Customer Response Pages" option...
At the top, under "Transaction Response Page" click the radio button for "Hosted By You" and enter the URL
of the thanks.php page in your site. For instance...
http://www.yourstoreurl.com/thanks.php
Please note, if you have an HTTPS connection then it is better to use this so customers do not get a warning
about moving from a secure to a non-secure connection. In that case the URL would be...
https://www.yourstoreurl.com/thanks.php
At the bottom is a required setting for "Customer Redirect after Check-out" and you can enter any URL you like, for instance
http://www.yourstoreurl.com/categories.php
You can also repeat this step for the "Custom Cancel Response Page" if required.
Click "Save" to save the changes in the "Customer Response Pages"
Click on the "Security" option...
On this Security page, click on "Create New Key".
Give the key any name such as "YourKey", and the Signature Version "Version 1" and Signature Method "HMAC-SHA256"
Click Generate Key.
You need to use the Secret Key and Access Key in your Ecommerce Plus admin, but don't worry, they are available to view for more than the 30 seconds provided by the popup window by clicking on the key in the security keys table. Take a note of the Secret Key and Access Key and click on "Return To Profile Home"
The 3rd and final piece of information you need is the Profile ID which you will see at the top of the Profile Home page. To the right of the Profile ID you will see a button "Promote to Active" and you need to click that to activate the profile.
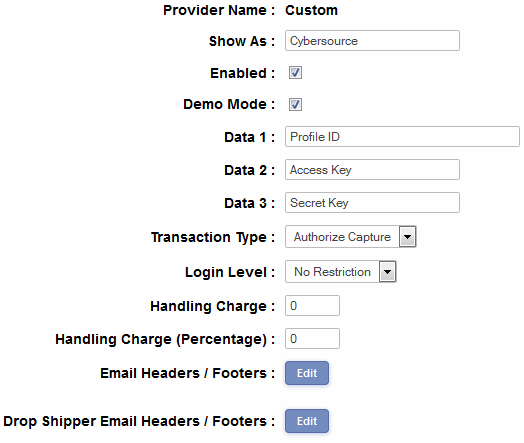
Now log in to your Ecommerce Templates admin page. Click on "Payment Providers" and then on "See full list of payment processors". Click on "Modify" for the payment method "Custom".

On this page you need to check "Enabled". Check "Demo Mode" only if setting up a test profile.
In the Show As field enter what you would like to display to customers on checkout, this may be the name of the payment provider but most people would enter something like "Credit card"
For Data 1 : Enter the Profile ID (Example: A5D92A62-1C82-414F-B15A-D3254B0E1D48)
For Data 2 : Enter the Access Key (Example: f1b33716f633381f8b49cf7263351063)
For Data 3 : Enter the Secret Key (Example: 4f7f986ee11747c19f0a1c71018a66cd24fe86172b48483089e13c5e9c333039c...and so on for 256 characters)
You should now be ready to run some tests through the system.
When you're ready to go live, don't forget to take Cybersource out of demo mode in your Ecommerce Plus Template admin section.