
Contact sales now: info@ecommercetemplates.com
Ecommerce Templates > PHP Version Help > PHP image upload
Version 5.5.0 saw the introduction of the image upload and resizing feature. This means that images can be uploaded through the control panel for the product and product detail pages. It is also possible to resize those images and set the sizes for each image through one simple interface.
When you click on New Product from the product admin page you will see something very similar to this
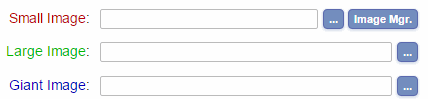
The small image is typically a thumbnail and will accompany the short description on products.php. The large image will appear on the product detail page and will typically be a larger version. The giant image is linked from the product detail page and is used for larger and / or more detailed images. You can have as many images as you like in each of these categories. Click on the "Image Mgr." button to be able to see them all.
Small Image Upload: Click on the ... button and you should see a window appear like this...
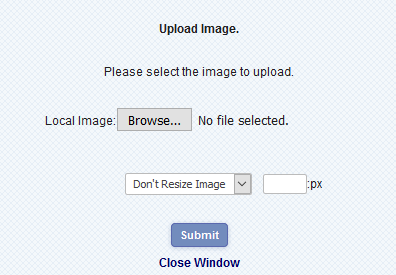
Click on the browse button to locate the image you want to locate on your hard drive. Select the width or height of the image you want it resized to, the software will calculate the proportionate heght or width so the images are not distorted. The system will upload and resize accordingly once you have hit the submit button.
Large Image Upload: Click on the ... button for the Large Image and you will see that the choices have changed somewhat
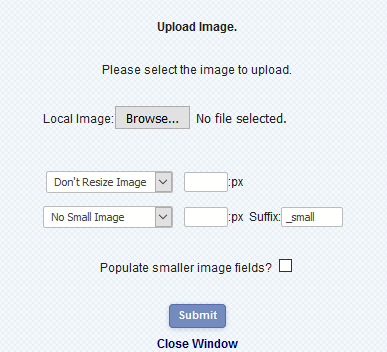
From this screen you can upload a large image but also make a thumbnail version to appear on the product page too. Once again you would browse to the image on your hard drive and then set a width or height if you need to resize the image. Click on the "Populate smaller image fields" if you want the resulting filename of the large image to populate the small image field, and choose a suffix for that image as it will need a different name from the one on your product detail page. Click the submit button and close the window to see the field(s) populated in your product admin page.
Giant Image Upload: Click on the ... button to upload an image that will be linked from your product detail page. This will typically be the largest and most detailed image...
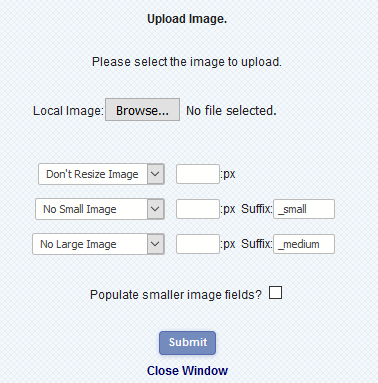
As you can see the screen is similar to the previous one but you can now also make an image for the product and product detail pages as well as for the giant image page. The procedure is the same as before where you will need to select the widths and heights and choose different suffixes.
You can choose to use completely different graphics for the small, large and giant images, in which case you would select the corresponding option - "No small image" and / or "No large image".
When you have finished uploading, remember to click on the submit button at the bottom of the product admin page or your changes won't be saved.
By default the images are saved in your /prodimages/ folder but if you would like to specify a different location on your server the add this to vsadmin/includes.php
$defaultprodimages = “newimagefolder/”;
... where newimagefolder is the directory where you want your product images saved to.
If you see this message after hitting the browse button
ERROR! Could not write file.
Please check the file permissions on your image directory.
then you should check the chmod settings for your prodimages folder. These should be set to 777 which is All and can READ, WRITE & EXECUTE and can be found by logging in to your site via FTP, right clicking the prodimages folder and look for Properties/CHMOD.
Another cause is if you are uploading images with the same file names as those already existing on the server. If this is the case, try using a different name for your images.
If you don't see the resizing boxes it is probably because your host hasn't enabled the GD image extension as part of the PHP executable. A note to your host should resolve the issue.
Do make sure you have the latest security patches installed on your server and do make regular back ups. Although you are going to be giving write permissions to the directory this shouldn't be available to a user through a browser but do bear this in mind when using this feature.