Contact sales now: info@ecommercetemplates.com
Ecommerce Templates > Payment Processors > Stripe

We have once again updated our Stripe integration and now there is no need to set up a webhook. Those wishing to integrate with Stripe are recommended to update to the latest v7.5 updater which greatly simplifies the Stripe integration. All you do is enter your Secret Key, Publishable Key and Store Name.
Stripe have updated their API and from v7.1.3 your Ecommerce Plus templates are compatible with the new SCA (Secure Customer Authentication) compatible integration, and it is highly recommended you use this. Now when you set up Stripe in your Ecommerce Plus admin there is an option "Integration Method", and choose, "New SCA-Ready Stripe Checkout". You also need to create a Webhook. To do this, go to your Stripe.com admin and to do that...
The rest of the setup is the same for both versions.
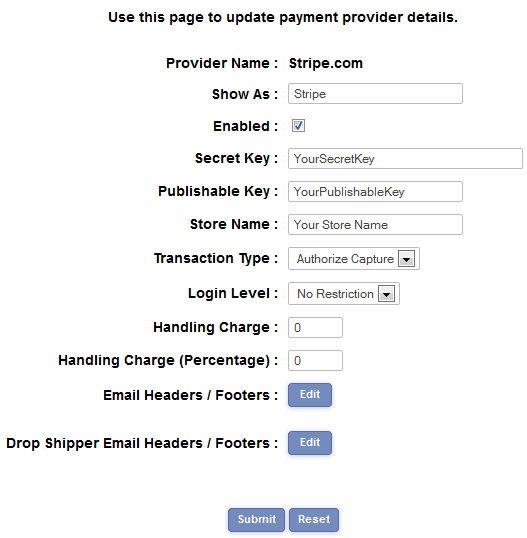
Once you have created your account with Stripe the first thing you will need to do is open your ecommerce template admin payment providers page. Locate the payment provider listed as "Stripe" and click on the Modify button. Fill in the details as shown below:

Show As - this is the text that will appear on your checkout for the customer to choose the payment method. You may want to enter the payment provider name or something more generic like "Credit Card".
The Secret Key and Publishable Key are available in your Stripe admin under Your Account > Account Settings > API Keys
To test payments enter the keys Test Secret Key and Test Publishable Key. When you are ready to go live with your store change those to the Live Secret Key and Live Publishable Key.
Enter the name of your store in the Store Name field, this will appear above the payment form on checkout.
For testing purposes use the credit card number 4242 4242 4242 4242 and any expiry date in the future. Other test numbers are available from Stripe.
NOTE - Although payments are taken in a pop up box on checkout for security reasons you should have an SSL certificate installed on your site to accept payments through Stripe. For testing purposes an SSL certificate is not required.
To add your own image or logo to the checkout pop up, go to your Stripe account and you can upload the image under the "Branding" section.
In the latest release we have included the ability for customers to use local payment methods like iDEAL (Holland), Bancontact (Belgium), Giropay (Germany), Przelewy24 (Poland), EPS (Austria), FPX and BACS Debit.
To enable these payment methods you must first go to your Stripe.com dashboard and click on Settings in the left hand menu and then under Business Settings -> Payments and payouts click on Payment methods.
After enabling in your Stripe.com dashboard you must wait until the payment method is live before going to your ECT admin Payment Providers area for Stripe and enabling the payment method there.