
Contact sales now: info@ecommercetemplates.com
Ecommerce Templates > ASP Version Help > Payment Processors > RBS Worldpay
![]()
Click here to create an account with WorldPay.
Once you have opened your account with WorldPay and been accepted, open your Ecommerce Plus Template admin pages and go to the Payment Provider section.
Now click on Modify next to WorldPay.
Where it says "Account Number" you want to enter the "Installation ID" that was sent to you by WorldPay.
IMPORTANT NOTE: Make sure it is your installation
ID and not your company ID that you enter. The 2 numbers are very
similar and can easily be confused.
Make sure that the Enabled and Demo Mode checkboxes are checked.
Please note that WorldPay would have given you a password to enter
their administration area. You do NOT want to enter that into the
Ecommerce Template admin area.
Now go to the WorldPay online administration area
at
https://secure.worldpay.com/sso/public/auth/login.html
Here you need to enter your WorldPay username and password.
Click on “Installations” in the left hand menu. Now
you should see your store instance listed, for instance…
123456 (Select Junior - QuickBooks – Your Store Ltd - QuickBooks)
Now click on the button for “Integration Setup” for
the TEST environment which will take you to the Installation Administration
page.
With your Ecommerce Plus template,
in the vsadmin directory, you will notice that you have a file
called wpconfirm.asp. You want
to set the "Payment Response URL" to point to this file.
So for instance it might be . . .
http://www.yourstoreurl.com/vsadmin/wpconfirm.asp
Make sure the "Payment Response enabled" checkbox is
checked.
Make sure the "Enable the Shopper Response" checkbox
is checked.
You are also encouraged to set up a Payment Response password and MD5 secret for transactions. All you do is on this Integration Setup page towards the bottom of that page, enter a value for these 2 settings. It can be anything you like using numbers and letters (between 21 and 30 characters including both upper and lower case, numbers and a special character but not @ or $) but make it different for the 2 values. Now go to your Ecommerce Templates admin payment providers page for WorldPay and enter these values you just set where you see “MD5 Secret (Optional)” and “Callback password (Optional)”.
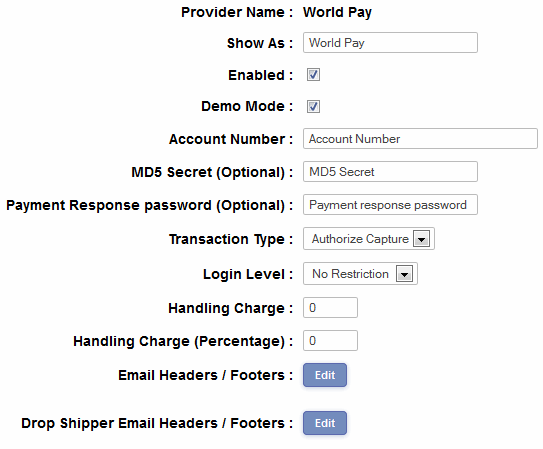
While in your WorldPay Payment Provider Admin page you should enter
your WorldPay account number and make sure the “Enabled” check
box is checked. You should check the “Demo Mode” check
box if using the test environment.
Now click “Submit” in your Ecommerce Templates admin
page and "save changes" in your WorldPay Installation
Administration page.
While your WorldPay account is in test mode you can use the following
Credit Card number for testing purposes . . .
4111 1111 1111 1111
. . . along with any valid (ie in the next 5 years) expiry date.
You are strongly encouraged to fully test the system.
After testing make sure to take your Ecommerce Plus template OUT of demo mode in the Payment Providers admin page.
Also, once you have finished testing at the bottom of the Installation Administration page where we made the above changes, right at the bottom of the page where you see “Copy Data of this Environment to Production Environment” click the button “Copy to Production”. Then click on the button in the left hand menu “Switch to Production” to start the process for going live.
WorldPay allows you to receive orders via credit card in multiple currencies.
Once a customer has added an item or items to their shopping cart and clicked on "Checkout" they are taken to a form to enter their personal details, once this is completed the customer can check their purchase total, and if they are in agreement will be forwarded to the secure WorldPay server to give their credit card details. Most of the WorldPay form is pre-populated by the details given on the store form so it only takes a moment to add the credit card number in a secure environment, and be sent back to the store again.
When the transaction has gone through, the buyer will receive a confirmation email from WorldPay and the seller will be informed that there has been an order on the store.
NOTE: md5 Secret and callback password features of WorldPay are supported.