
Contact sales now: info@ecommercetemplates.com
Ecommerce Templates > ASP Version Help > Payment Processors > iTransact

Once you have created your account with iTransact the first thing you will need to do is download the file itransactasp.zip from our downloads page. The zip file contains two files, customppsend.asp and customppreturn.asp. These contain all the information you need for the iTransact integration for the Ecommerce Templates. Unzip the download and place the two files in your vsadmin/inc/ folder, overwriting the existing files - agree to overwrite if prompted.
You will need to ask iTransact to enable XML API Access on your account. This iTransact XML API integration requires that the customer credit card number is taken on your site. For this reason you will require an SSL certificate and your host should be able to give you more details about that if you are unsure.
Log in to your iTransact control panel, and click on Account Settings. Now under Advanced Features you should see an API Username and API Key.
Login to your Ecommerce Plus admin page, go to Payment Providers and click on "Custom". You need to check "Enabled" and enter the following details...
Data 1 : Your Gateway ID number
Data 2 : API Username
Data 3 : API Key
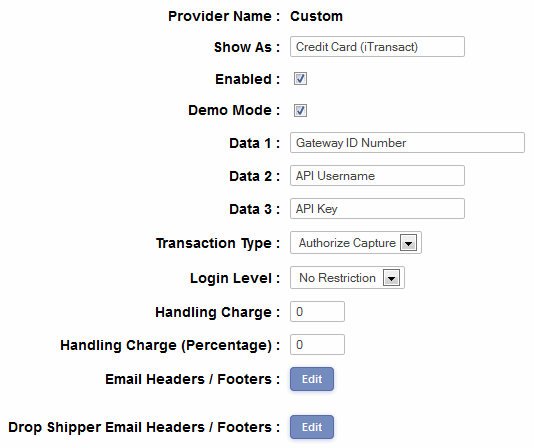
It's a good idea to send some test transactions through the system so check the "Demo Mode" box. You can use 5454545454545454 as a test credit card number.
NOTE
This is a temporary requirement for versions
up till v5.9
Open the file vsadmin/inc/inccart.asp in notepad and search for
< !--# include file="customppreturn.asp"-->
...and replace that with...
<!--# include file="customppreturn.asp"-->
That is you just remove the space between "<" and "!".
If you have any questions about setting up an account with iTransact, please call Todd Richardson on 801-951-8121
Please do read our guide here on credit card fraud.